Overview
This portfolio aims to document the contributions made by Jason Chong Yi Sheng to the ExpenseTracker.
ExpenseTracker is a desktop expense tracking application developed to aid users in tracking their expenses and saving money. The user interacts with it using a Command Line Interface (CLI), and it has a Graphical User Interface (GUI) created with JavaFX library. It is written in Java, and has about 28 kLoC. The product was morphed from an Address Book over a period of 8 weeks under the constraints described here.
Some of its main features are: Setting a budget for expenses, data security, categorization and statistics for expenses.
Summary of contributions
-
Major enhancement: added Data Security
-
What it does: Allows multiple users to use the application on the same machine without being able to view or affect each other’s data without their passwords. Also keeps each user’s data file encrypted and inaccessible by others.
-
Justification: This feature improves the product significantly because multiple users can share the application on the same computer. For many people, financial information is often kept private so this function allows them to use the application without fear of other’s having unauthorized access to their spending data.
-
The following are the highlights of this feature:
-
This enhancement adds a robust user accounts system that comes with several features, namely
signup,loginandsetPassword. Each user’s data file is kept separately and explicitly labelled with their username. The implementation too was challenging as it required changes to how data is loaded in theStoragecomponent and stored in theModelcomponent. -
The encryption algorithm also makes use of hash algorithms and the AES symmetric key encryption algorithm to ensure that no one can gain access to a user’s information unless he/she knows the plain text password of the user, which is not stored anywhere.
-
-
Credits: Google Guava library for common hashing algorithms.
-
-
Code contributed: [Code collated by RepoSense]
-
Other contributions:
-
Project management:
-
Managed releases
v1.1-v1.4(5 releases) on GitHub
-
-
Community:
-
Tools:
-
Integrated the following Github plugins to the team repo: TravisCI, Appveyor, Codacy, Coveralls
-
Added Reposense configuration file to allow for collation of teammates' code contributions
-
-
Contributions to the User Guide
Given below are sections I contributed to the User Guide. They showcase my ability to write documentation targeting end-users. |
Features
|
These are the commands available to use in Expense Tracker:
Signing up a user : signup
Creates a new user in Expense Tracker. You can log in to your newly created user after signing up.
Format: signup USERNAME
|
Logging in as an existing user : login
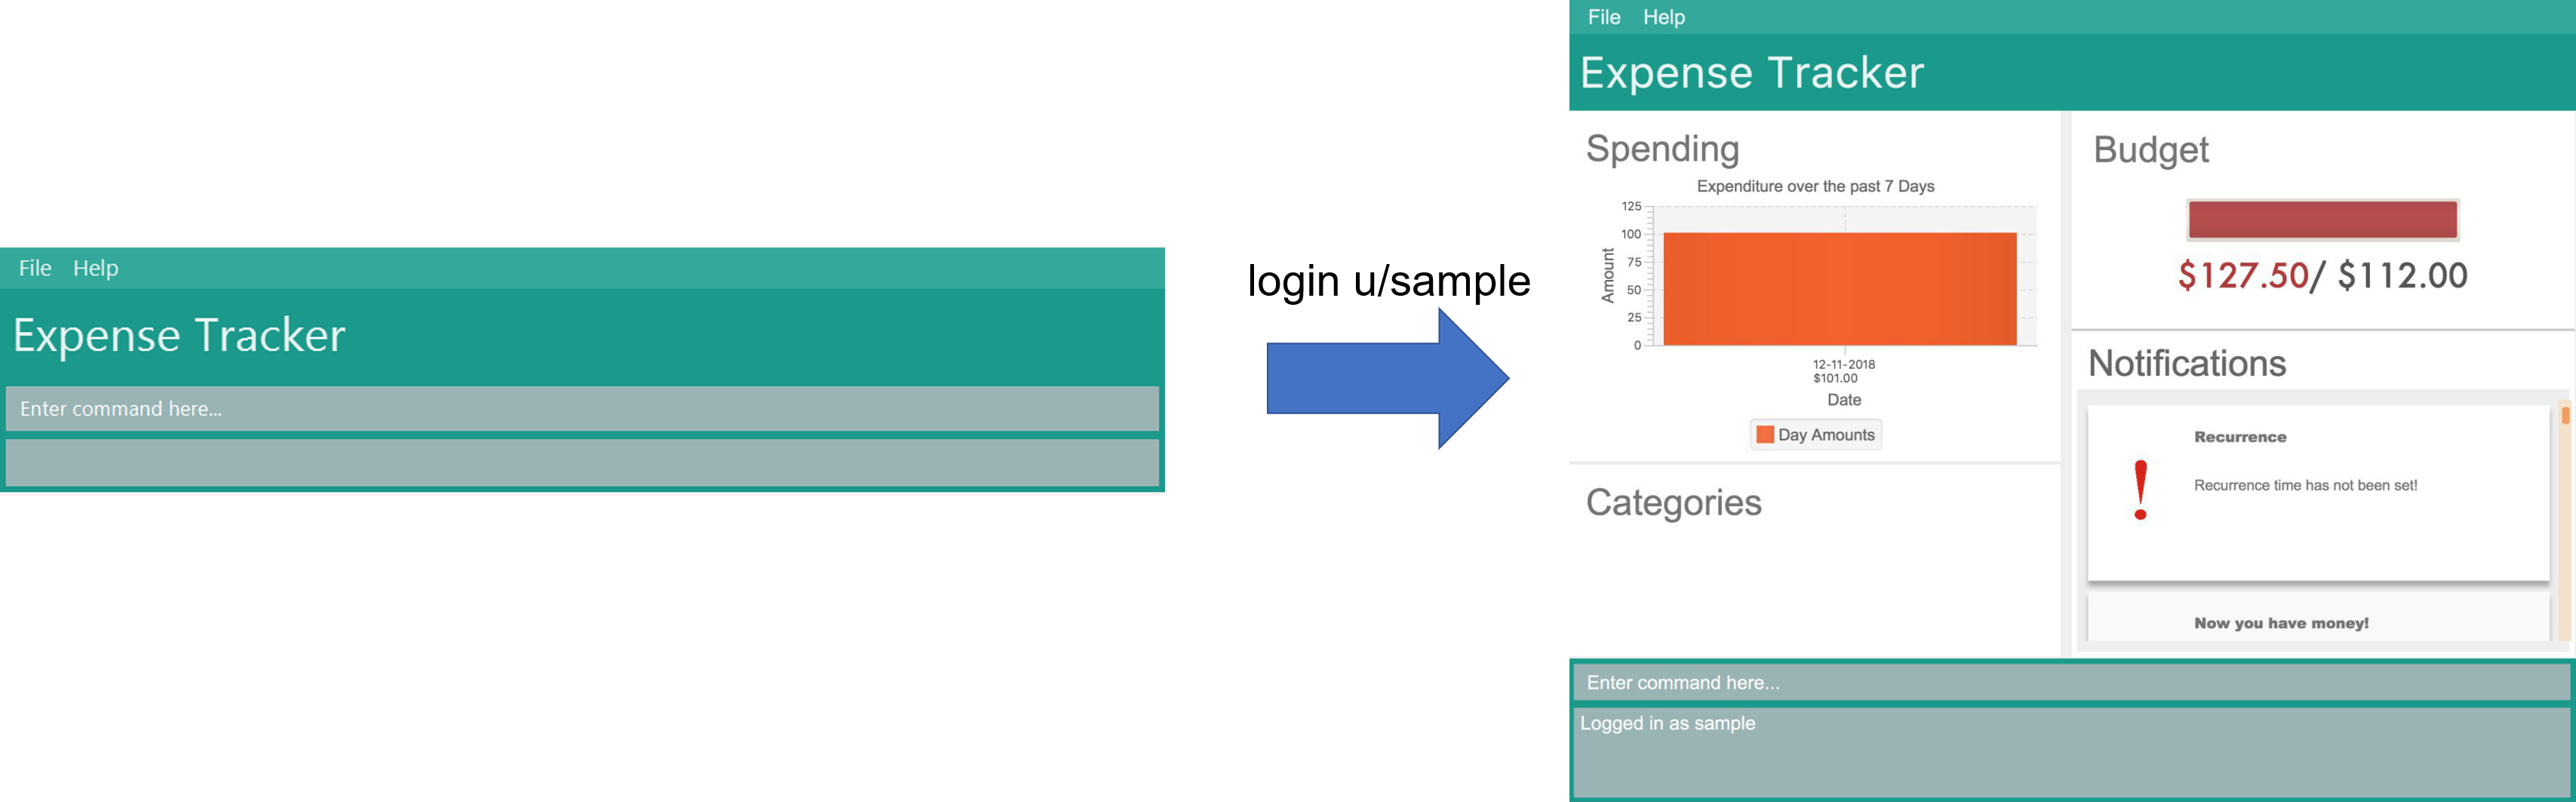
Logs in to Expense Tracker as an existing user and expands the user interface to show Expense Tracker if it is not already showing.
Format: login u/USERNAME [p/PASSWORD]
|
If the log in is successful (ie. the USERNAME and PASSWORD are correct and the user’s data has no issues), then the UI will be expanded as shown in the diagram below:
Setting a password for the current user : setPassword
Sets a new password for the user which is currently logged in.
Format: setPassword n/NEW_PASSWORD [o/OLD_PASSWORD]
|
I have also contributed documentation for the |
Contributions to the Developer Guide
Given below are sections I contributed to the Developer Guide. They showcase my ability to write technical documentation and the technical depth of my contributions to the project. |
Data Security
The Expense Tracker ensures the security of users' data through the user accounts system and data encryption.
The user accounts system allows multiple users to use Expense Tracker on the same computer without interfering with each other’s data. It also includes an optional password system that allows users to protect their Expense Tracker information from being viewed or altered by others.
The encryption system ensures all expense data (excluding budget) is encrypted within the xml storage files.
Current Implementation
On initialization, MainApp class loads all xml files within the data folder according to the path in UserPrefs. The data is loaded by MainApp#initModelManager(Storage, UserPref).
|
The username value will be forced to match the name of the xml data filename (ignoring file extentions). |
This feature is facilitated by 9 newly added methods in the
The list of these methods along with their descriptions have been omitted in this portfolio and can be found in the |
When implementing methods in ModelManager that requires a user to already be logged in, one can use ModelManager#requireUserSelected(), which throws a checked NoUserSelectedException if there is no logged in user. I.e your method should look like this:
@Override
public void methodName() throws NoUserSelectedException {
    requireUserSelected();
    // Rest of the method body...
}
The classes Username and Password have also been implemented and have the following noteworthy characteristics:
-
Two
Usernameclasses are equivalent if and only if the internal usernameStringare equivalent (case-insensitive). -
Usernamecannot be constructed with aStringcontaining a white space or any of the following characters: " > < : \ / | ? * -
When a
Passwordclass is constructed with plain text, the password is hashed using SHA-256 before being stored as an internalStringin thePasswordobject -
Passwordis only valid if the plain text form is at least 6 characters long
Utility methods related to data encryption are implemented in the EncryptionUtil class. They include methods to encrypt/decrypt |
Encrypted versions of the ExpenseTracker and most of the classes it contains were implemented. These classes have their class names prepended with Encrypted and are shown in the class diagram below:
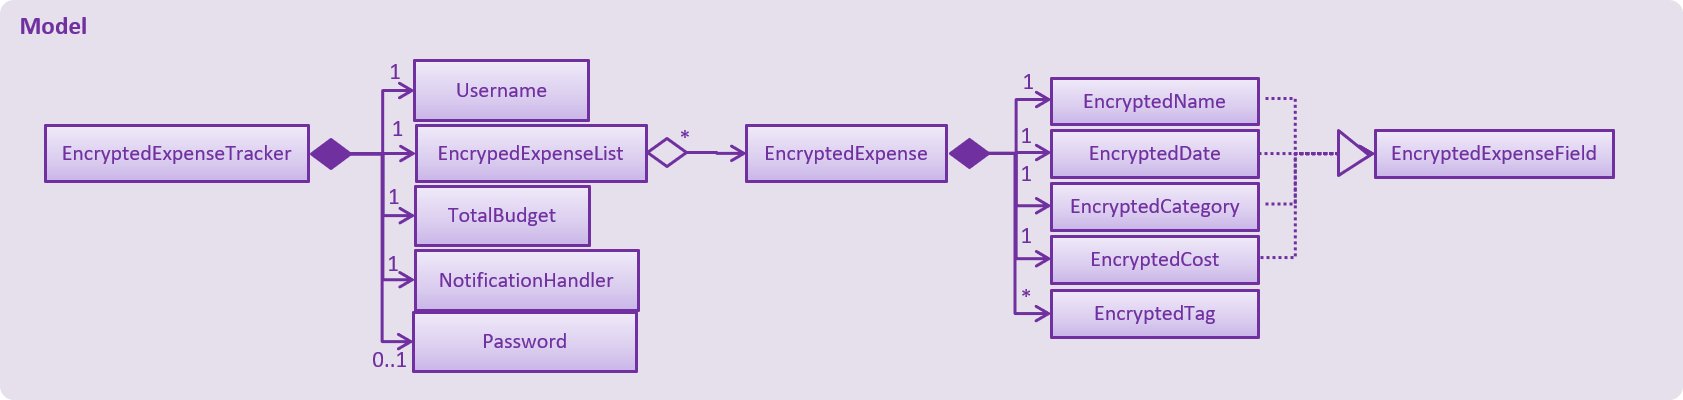
Enrypted classesThe following are other noteworthy details of the implementation for data encryption:
-
Users' expense data are encrypted using
AESencryption with a 128-bitMurmurHashof their plain text password as the encryption key. These are not stored anywhere in the data files to ensure the security of their data. -
The encrypted information is stored in new classes to ensure that encrypted data is not used before decryption.
-
The encrypted information has to be stored in
Modelas the encryption key will only be known at runtime when a user logs in with his/her correctPassword. -
Each Encrypted class will know how to decrypt itself into its decrypted equivalent. e.g
EncryptedExpenseField#decrypt(String)uses the inputStringas an encryption key to decrypt itself into aExpenseField.
Below is an example usage scenario and how the User Account System behaves at each step when the application is launched.
-
The user launches the application and the directory path in the UserPref points at the data folder
-
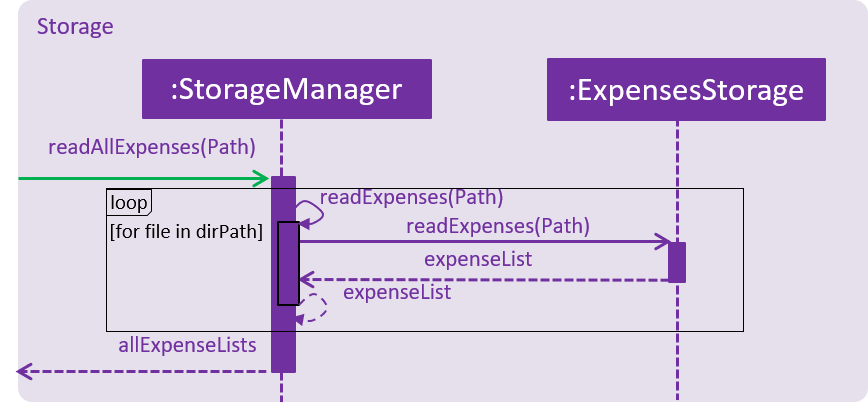
The method
StorageManager#readAllExpenses(Path)is called by the MainApp and the method loads all the xml data files in the data folder and returns the loaded data as aMap<Username, EncryptedExpensetracker>with theUsernameof the user data as the key and the user data as anEncryptedExpenseTrackeras the value to the MainApp class. -
A
Modelinstance will then be initialized using the previously mentionedMapof user data.
Below is the UML sequence diagram of the StorageManager#readAllExpenses(Path) method mentioned.
StorageManager#readAllExpenses(Path) methodBelow is an example usage scenario and how the Sign Up and Login system behaves at each step after the application is launched.
-
The user executes the command
signup johnto create a user with theUsernamejohn -
The
signupcommand callsModel#addUser(Username)which adds the userjohntoModel. The operation is successful asjohndoes not break any of theUsernameconstraints and does not already exist in the Model. -
The user then executes the command
login u/johnto log in to his user account -
The
logincommand calls theLoginCredentials(Username, String)constructor with a nullStringpassword as a password was not provided. -
The
logincommand then callsModel#loadUserData(LoginCredentials)with theLoginCredentialsinstance created in the previous step. The method is executed successfully as the userjohnhas no password set. -
john’s data that is stored asEncryptedExpenseTrackeris decrypted using theEncryptedExpenseTracker#decryptTracker(String)using an encryption key generated fromjohn’s password (In this case an emptyStringis used as the password sincejohn’s account has no password). -
The selected data in
Modelis switched tojohn’s and anUserLoggedInEventis raised forUIto showjohn’s Expense Tracker data
The sequence diagram for SignUpCommand has been omitted as it is largely similar to subsequent sequence diagrams in this section. You can view it in the |
Below is the UML sequence diagram that shows how LoginCommand works.
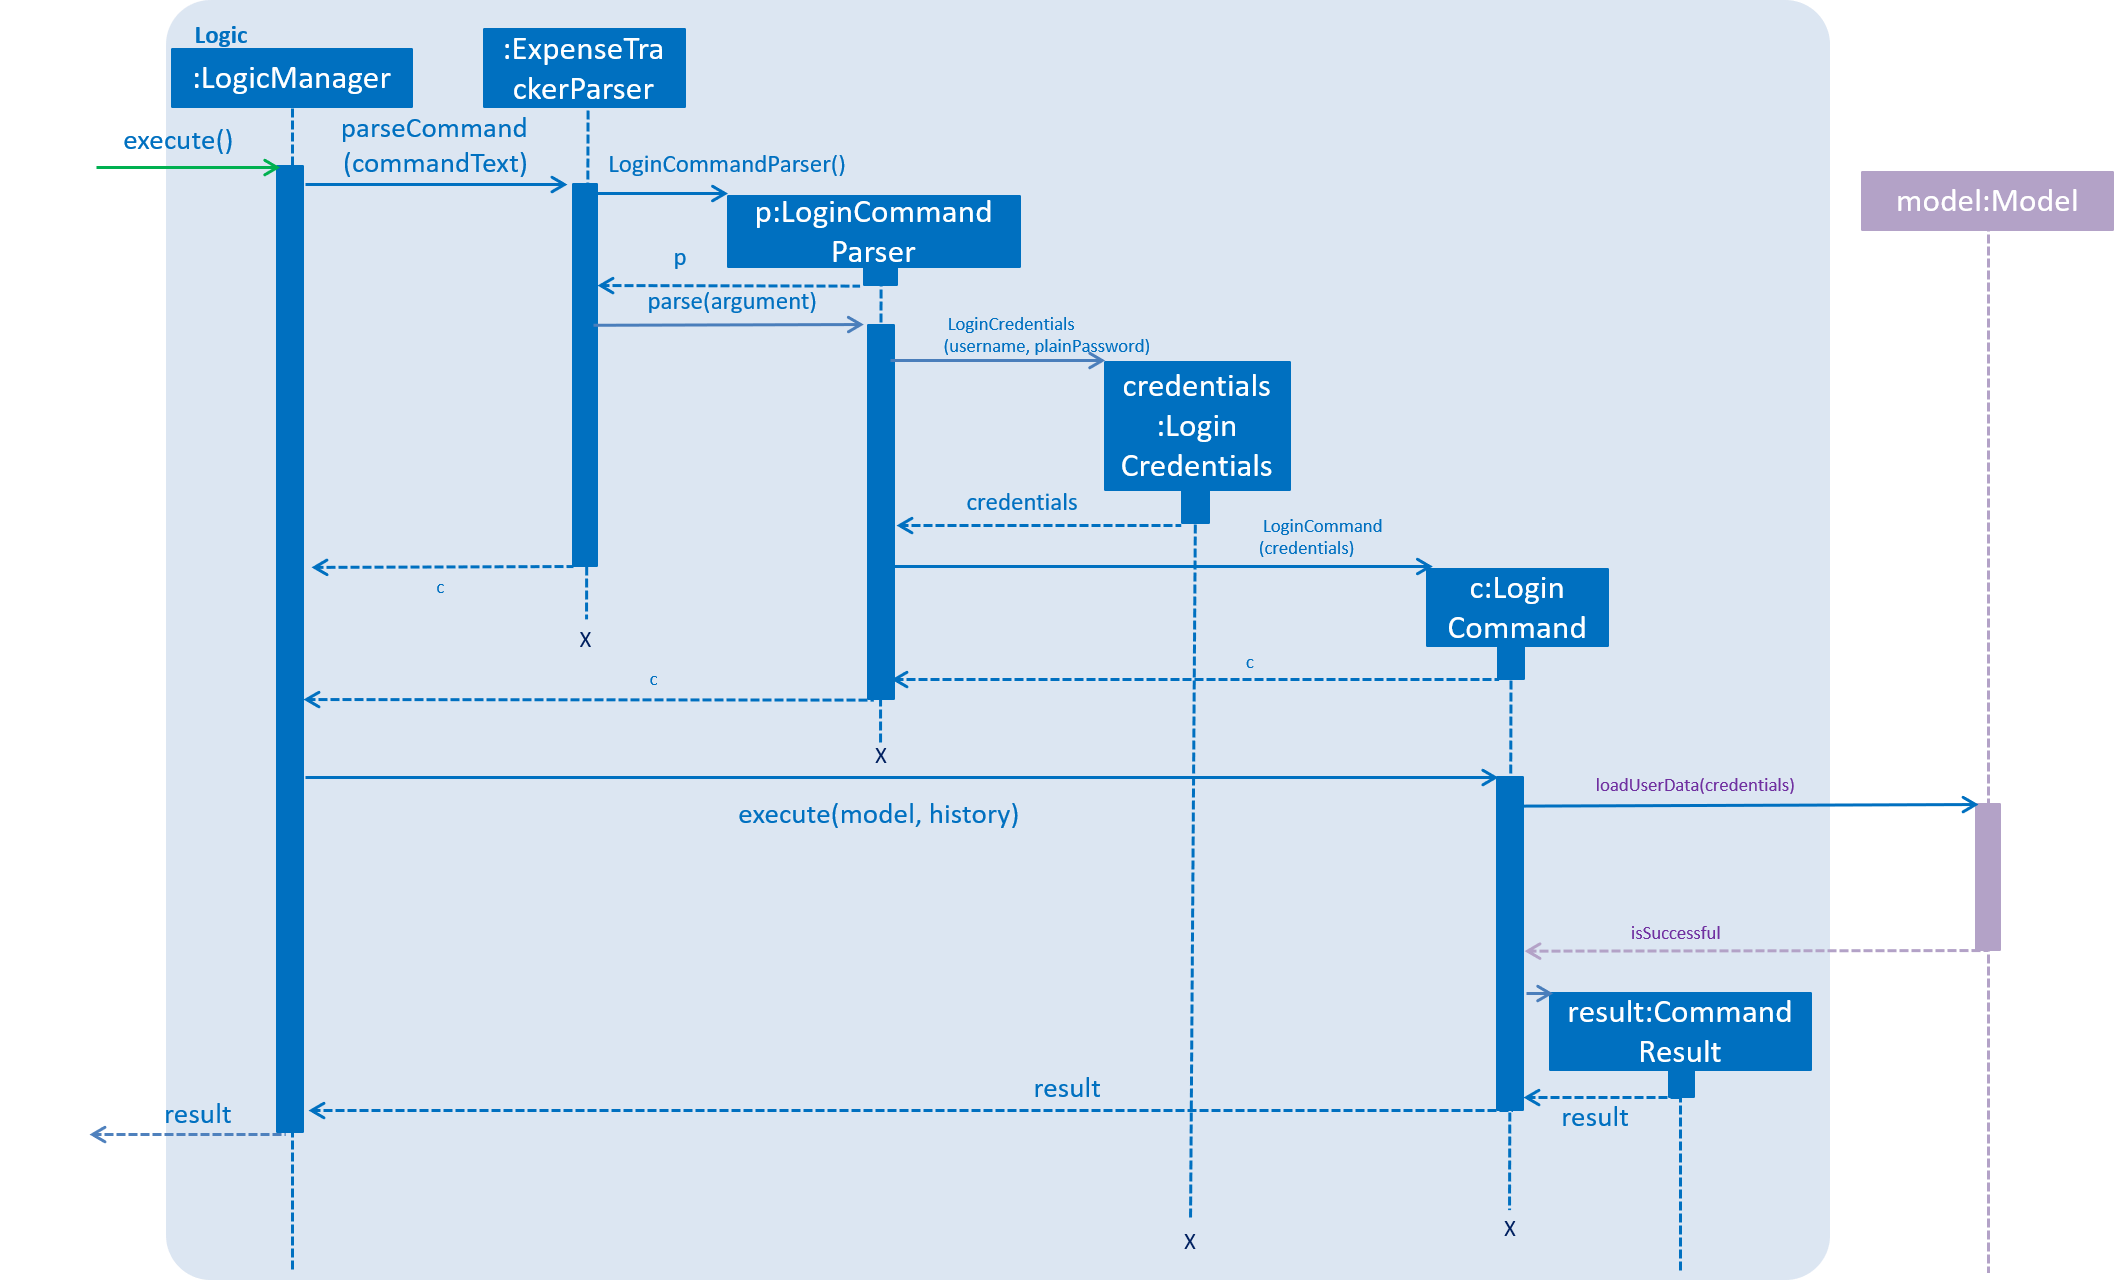
LoginCommand worksBelow is an example usage scenario and how the Password system behaves at each step after the he/she is logged in.
-
The user is already logged in to the account
johnwith an existing passwordpassword1and executes the commandsetPassword o/password1 n/password2to change his password topassword2 -
The
setPasswordcommand calls theModel#setPassword(Password)method since the given old password matches his existing password andpassword2does not violate any password constraints -
The
Model#setPassword(Password)method changesjohn’s account password topassword2 -
john’s expense data gets encrypted using a new encryption key generated from theStringpassword2. This also applies in future whenever it is saved to the data file.
Below is the UML sequence diagram that shows how SetPasswordCommand works.
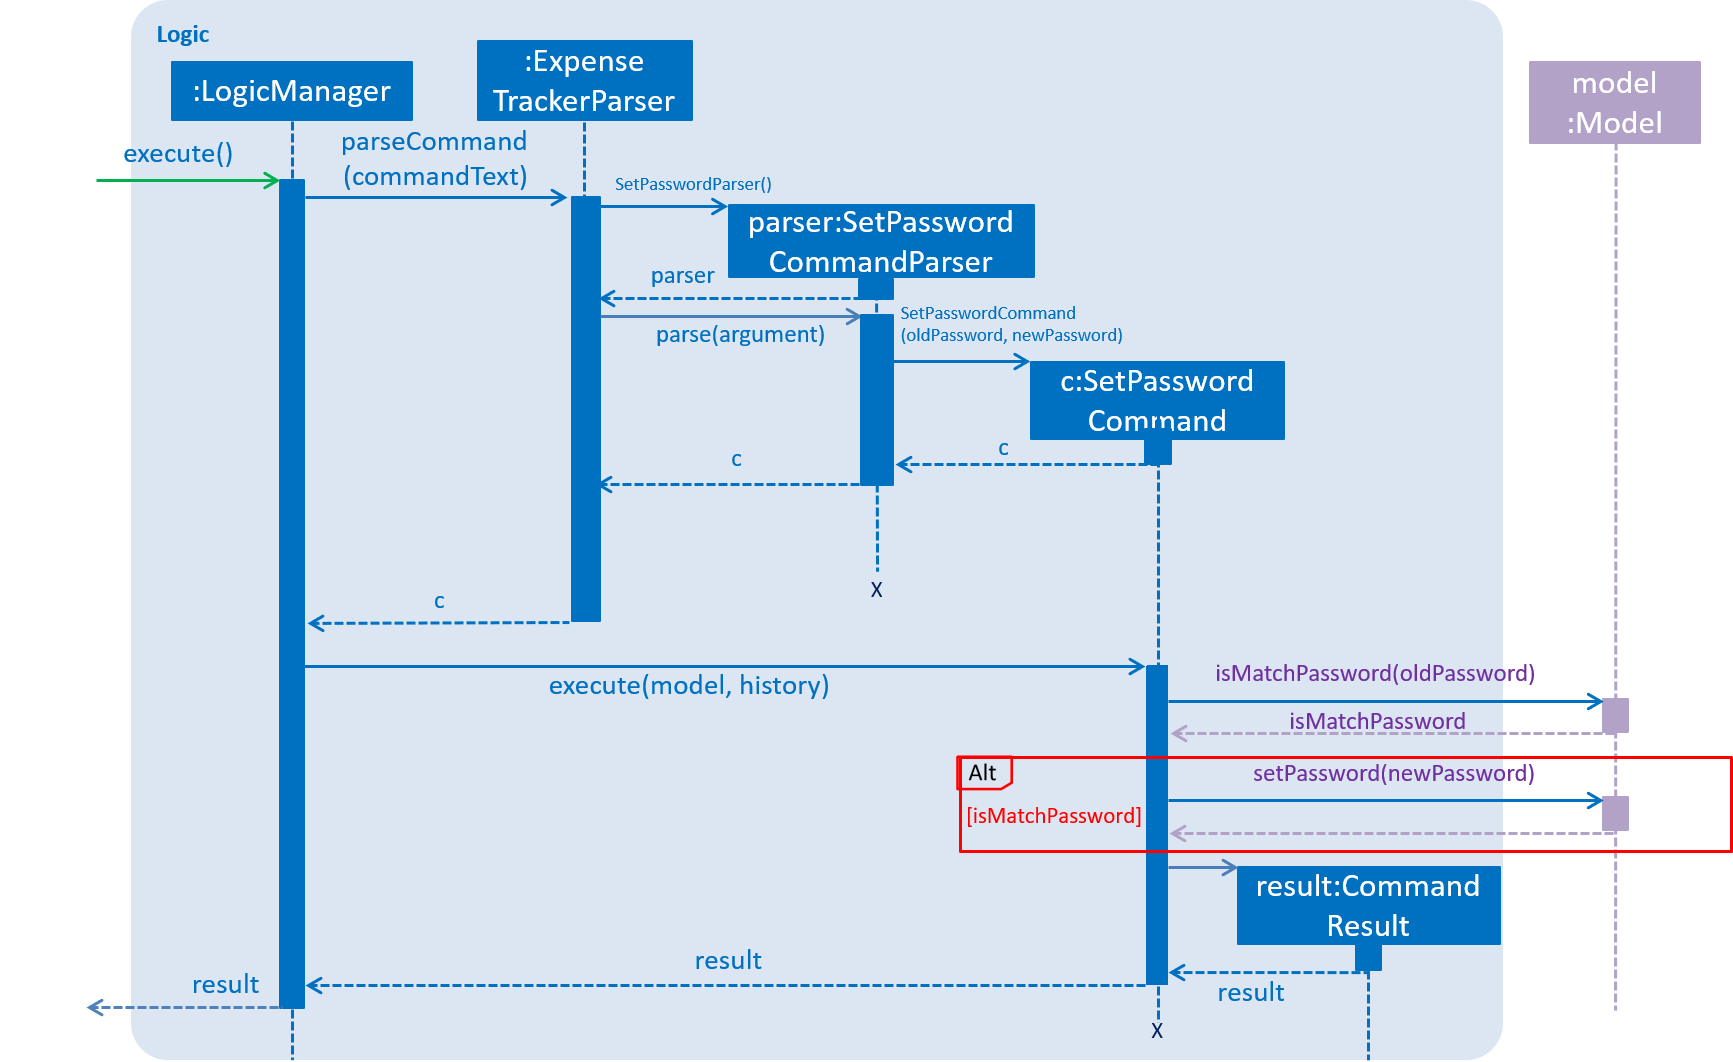
SetPasswordCommand worksDesign Considerations
Aspect: Loading of User Data
-
Alternative 1 (current choice): Loading of User data is only done on initialization of Expense Tracker
-
Pros: Ability to switch user accounts quickly after Expense Tracker is loaded as all users are already loaded into memory
-
Cons: External changes to the data files after initialization will not be reflected may be overwritten
-
-
Alternative 2: User data is loaded only when the user attempts to log in
-
Pros: Unnecessary data is not kept in memory so memory space is not wasted
-
Cons: The Model or Logic component will have to depend on the Storage component as the login command will require the Storage to load and return the user’s data.
-
Another aspect, |