Overview
This portfolio aims to document my role and contribution to the ExpenseTracker.
ExpenseTracker is a desktop application used for tracking user’s expenses. The user interacts with it using a Command Line Interface (CLI), and it has a Graphical User Interface (GUI) created with JavaFX. It is written in Java, and has about 28 kLoC. It is the product of CS2103T team project.
The main purpose of this project is to morph AddressBook - Level 4, a given desktop application, into any new application. We work as a team of 5.
Some of the main features of ExpenseTracker are:
-
Setting a budget for expenses.
-
Multiple user accounts.
-
Categorization of expenses.
-
Statistics for expenses.
Summary of contributions
This section summarizes my contribution to the project.
-
Major enhancement:
-
Added the ability to find and edit multiple expenses by specific keywords
-
What it does: Allow user to filter out the particular expenses by entering relevant keywords. Allow user to edit all targeted expenses at the same time.
-
Justification: This feature improves the product significantly because now it is more convenient for user to find and edit particular expenses. Now users can easily view the list of expenses with desired details, for example,specific name, category, cost and date. With mass edit, users can easily correct the wrongly recorded expenses.
-
Highlights: This feature enhances the original filtering function. This makes the application more user-friendly as filtering is one of the most frequently used commands in this application.
-
-
-
Minor enhancement:
-
Refactored original
AddressBookandPersonclass intoExpenseTrackerandExpenseclass. -
Updated sample entries.
-
Modified the original
UniquePersonListintoExpenseListto allow for duplicateExpense.
-
-
Code contributed: [code]
-
Other contributions:
Contributions to the User Guide
Given below are sections I contributed to the User Guide. They showcase my ability to write documentation targeting end-users. |
Locating expenses by keywords: find
Finds expense which contains all the given keywords.
Format: find [n/NAME] [c/CATEGORY] [$/COST:COST] [d/DATE:DATE] [t/TAG…]
To use find command, simply enter the command in correct format and the desired expenses will be shown
on the expense list panel. The diagram below illustrates the effect of find command.

|
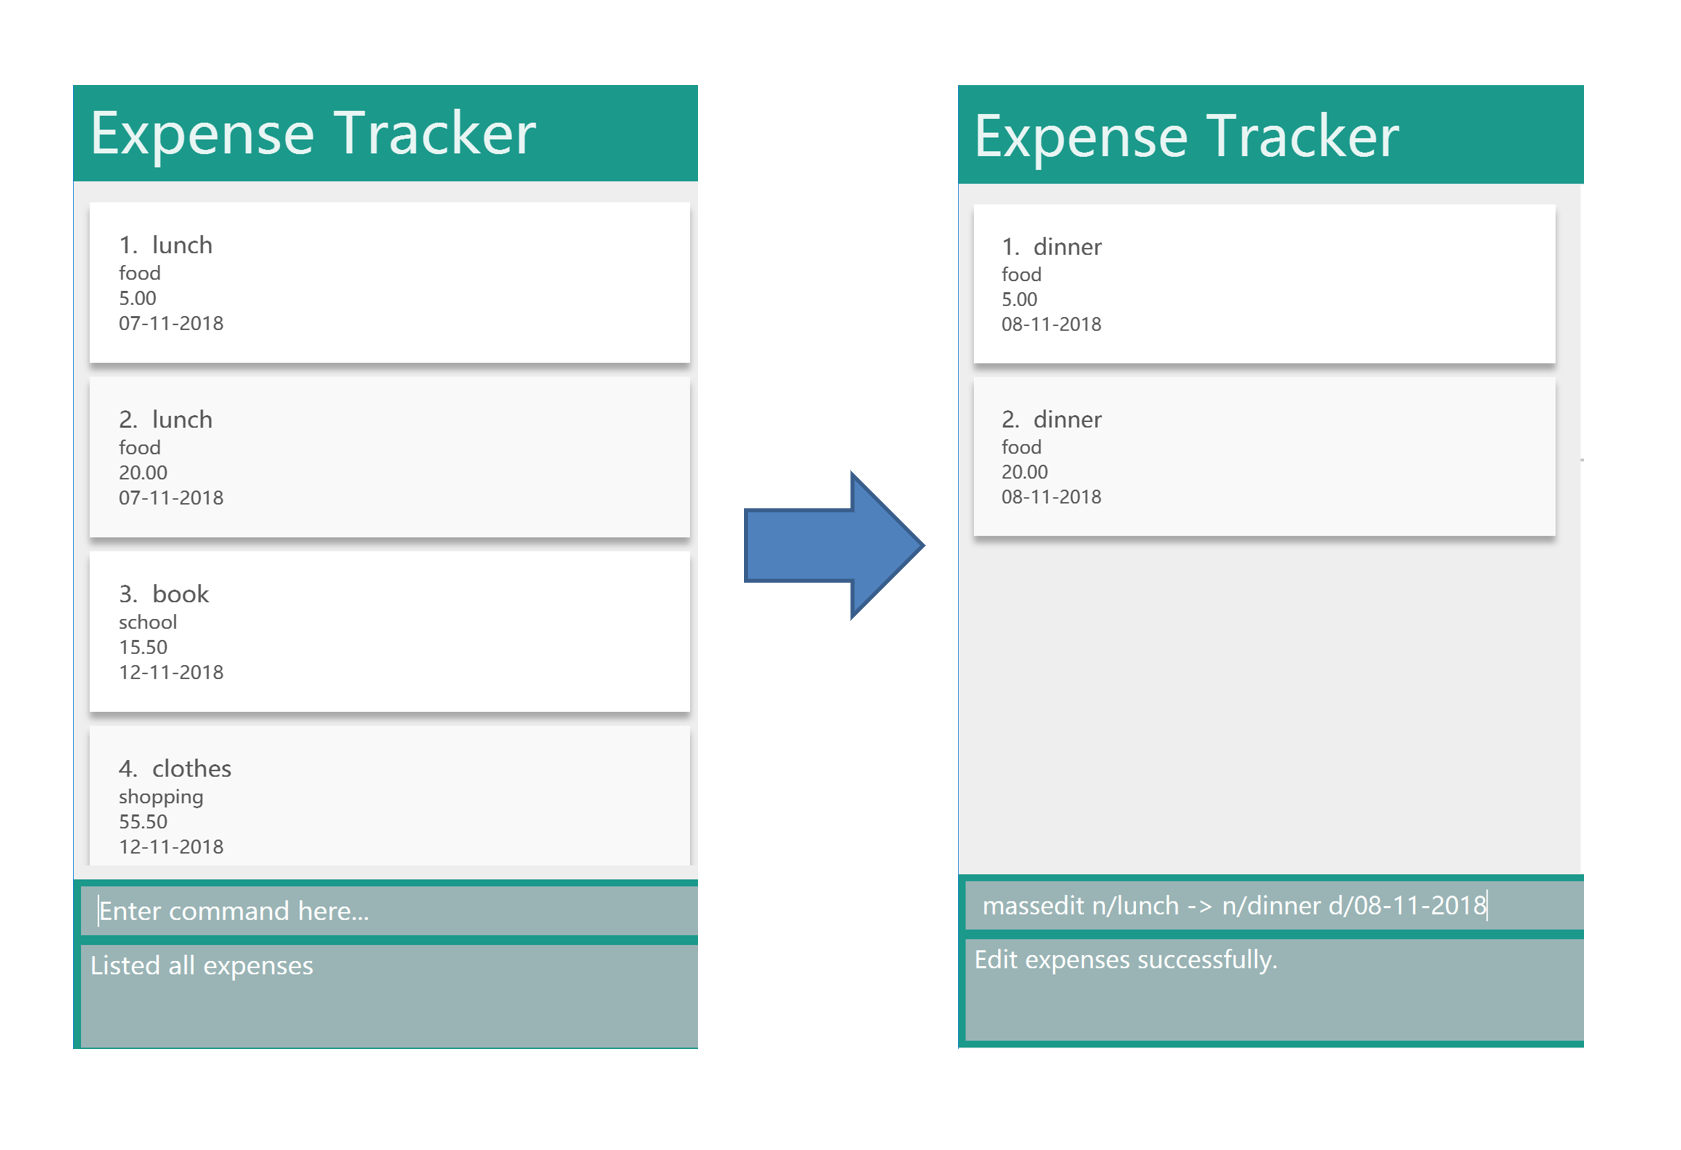
Editing multiple expenses : massedit
Edits the all expenses which match the keywords specified.
Existing values of the expense will be edited according to the value of the parameters
Format: massedit [n/EXPENSE_NAME] [$/COST] [c/CATEGORY] [d/DATE] [t/TAG…] -> [n/EXPENSE_NAME] [$/COST] [c/CATEGORY] [d/DATE] [t/TAG…]
To use massedit command, simply enter the command in correct format. The
edited command will be shown on the expense list panel. The diagram below illustrate
the effect of massedit command.
|
Contributions to the Developer Guide
Given below are sections I contributed to the Developer Guide. They showcase my ability to write technical documentation and the technical depth of my contributions to the project. |
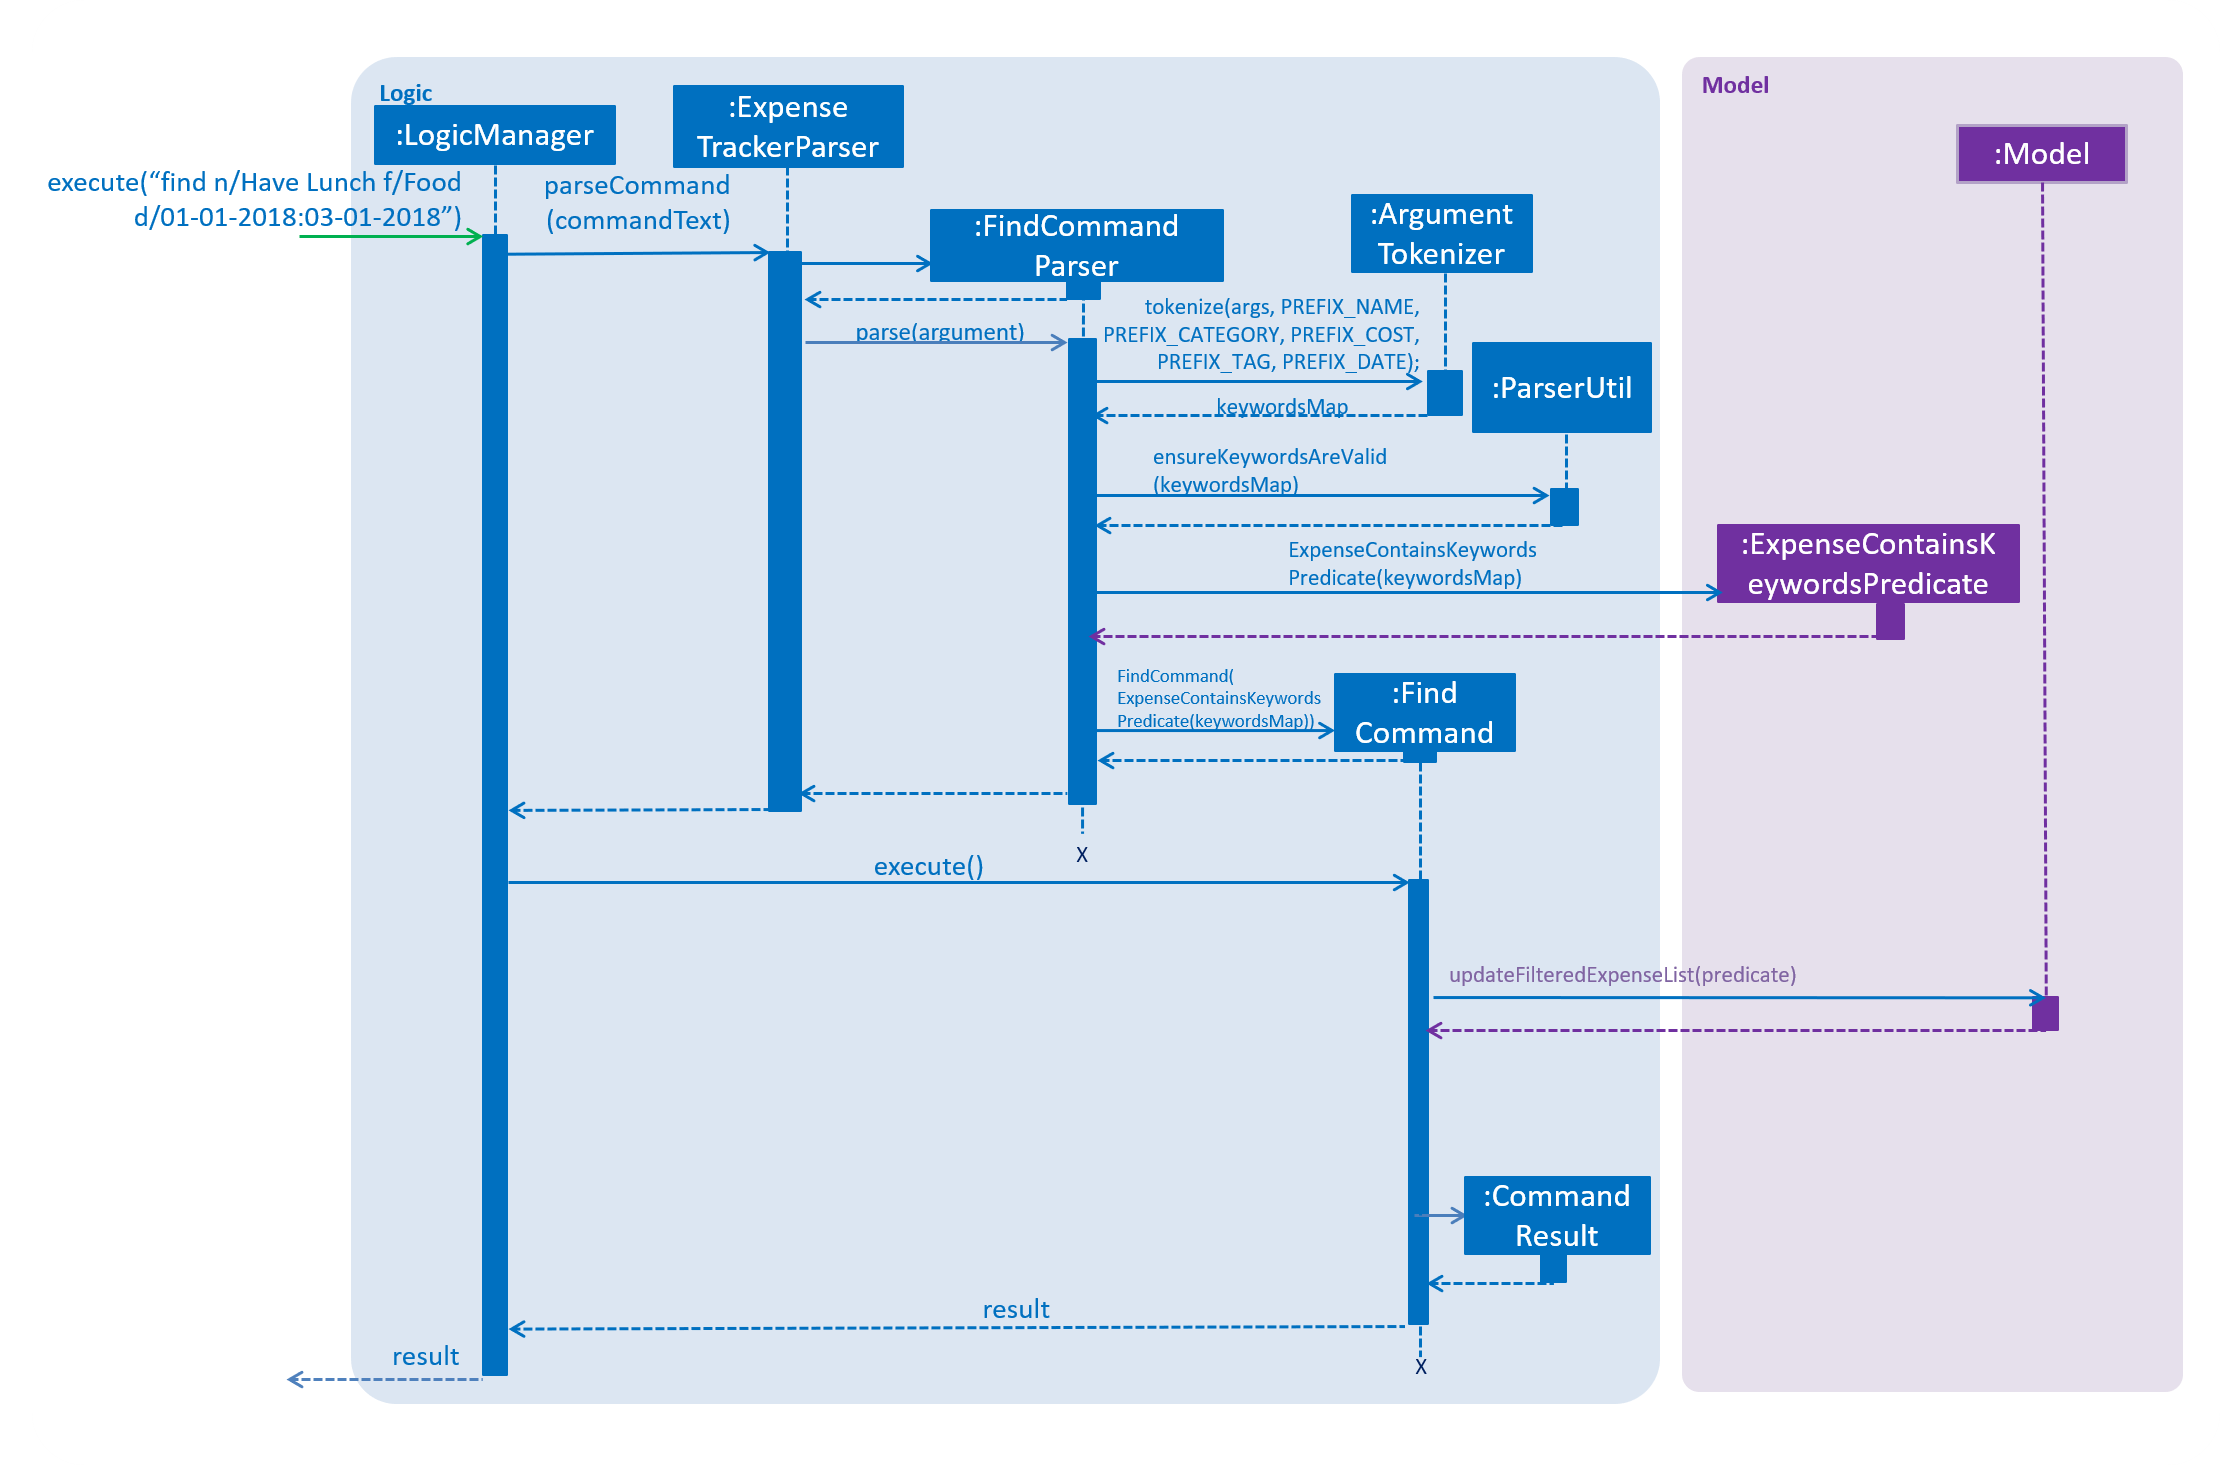
Find
This feature allows users to filter out specific expenses by entering multiple keywords. Only the expenses which contain all the keywords will be shown on the expense list panel.
This implementation is under Logic and Model Components.
Current Implementation
Below is the UML sequence diagram and a step-by-step explanation of an example usage scenario.
-
User enters command
find n/Have Lunch f/Food d/01-01-2018:03-01-2018. The command is received byExpenseTrackerParser, which then creates aFindCommandParserObject and callsFindCommandParser#parse()method. -
FindCommandParser#parse()method callsArgumentTokenizer#tokenize()to tokenize the inputStringinto keywords and store them in anArgumentMultimapObject. -
FindCommandParser#parse()method then callsParserUtil#ensureKeywordsAreValid()method. If any of the keywords doesn’t conform to the correct format,ParseExceptionwill be thrown. If no exception is thrown, aExpenseContainsKeywordsPredicateObject is created. It implements Predicate<Expense> interface and is used to filter out all the expenses which matches the keywords entered by the user. -
A
FindCommandObject with theExpenseContainsKeywordsPredicateObject as parameter is created and returned toLogicManager. -
LogicManagerthen callsFindCommand#execute(),which callsModel#updateFilteredExpenseList()method to update the predicate of FilterList<Expense>. FilterList now contains new set of expenses which filtered by the new predicate. -
Then the expense list panel will show a new set of expenses according to the keywords. A
CommandResultis then created and returned toLogicManager.
Design Consideration
This feature can be implemented in different ways in terms of how the target expenses are found. The alternative ways of implementation are shown below.
Aspect: How to filter out targeted expenses
-
Alternative 1 (current choice): Check through all expenses and select those with all the keywords
-
Pros: Easy to implement. No need to change original architecture.
-
Cons: Time-consuming. Tend to take longer time when there is a large number of expenses.
-
-
Alternative 2: Store expenses in separate files and only check the relevant files while filtering.
-
Pros: More efficient. No need to check every expense.
-
Cons: Need to change the original architecture of storage.
-
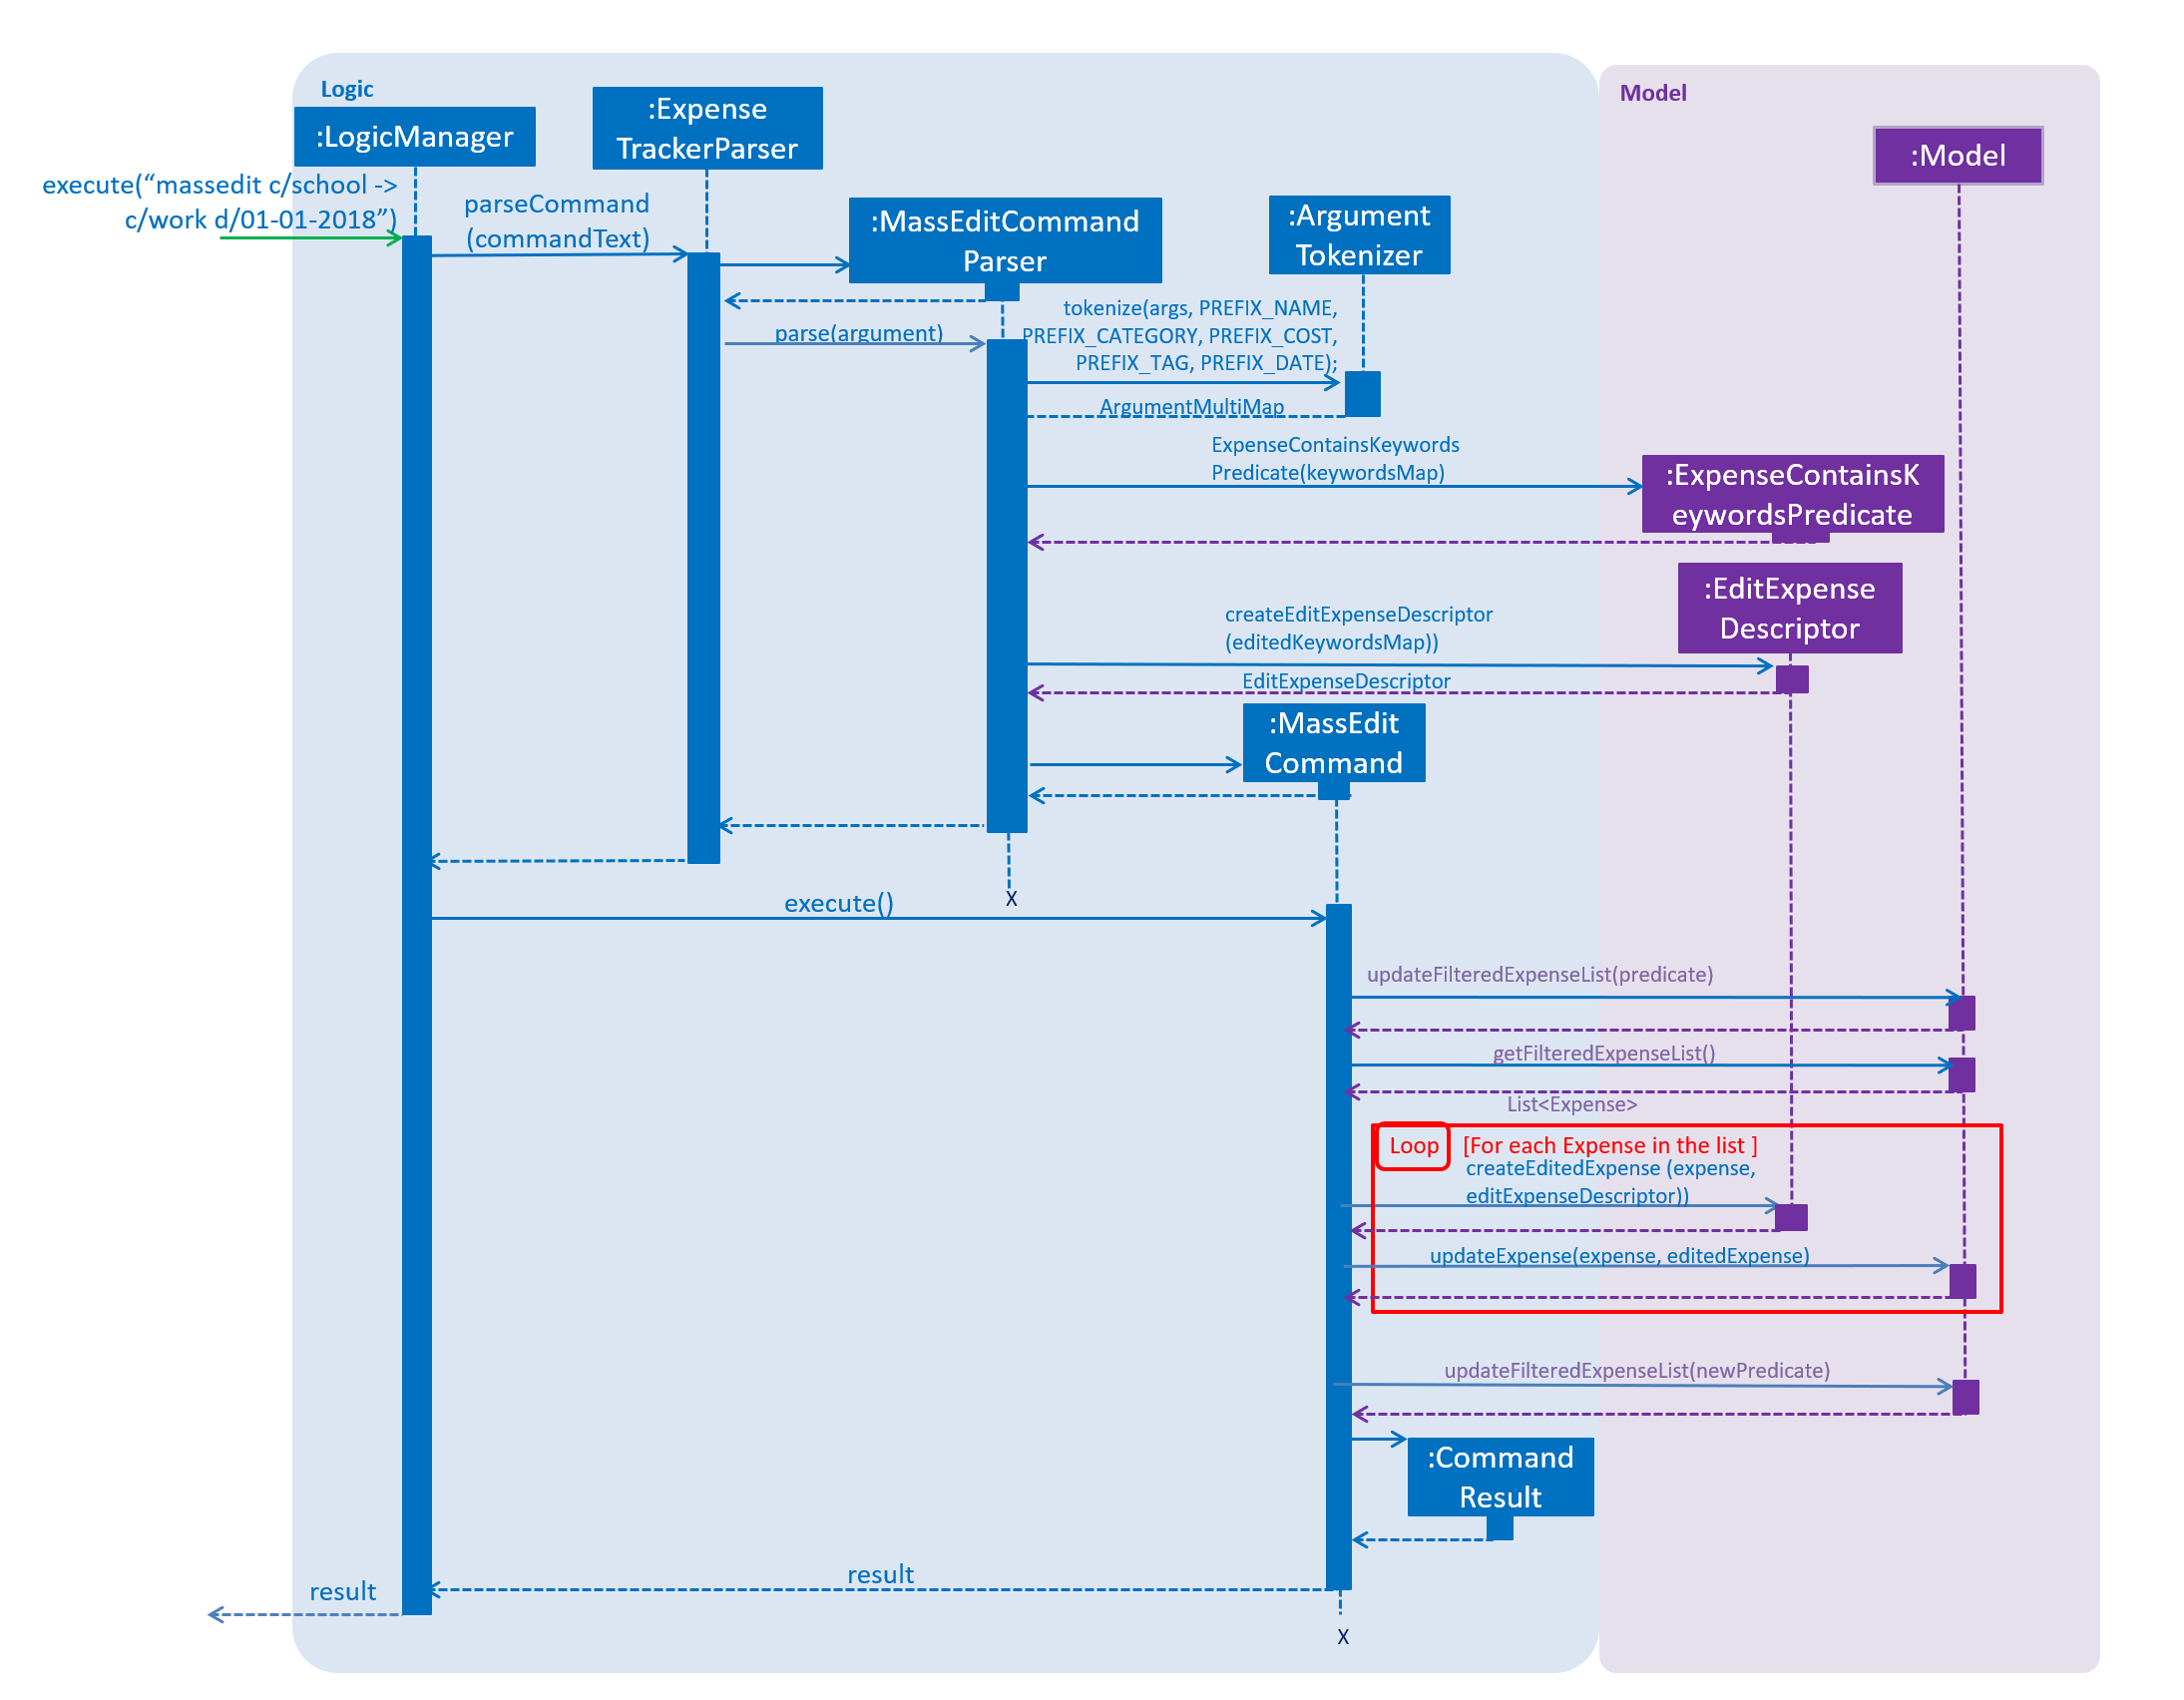
Mass Edit
This feature allows users to edit multiple expenses at the same time. Users need to enter the keywords to identify the targeted expenses as well as the fields they would like to edit.
This implementation is under Logic and Model components.
Current implementation
Below is the UML sequence diagram and a step-by-step explanation of an example usage scenario.
-
User enters command
massedit c/school -> c/work d/01-01-2018. The command is received byExpenseTrackerParser, which then creates aMassEditCommandParserObject and callsMassEditCommandParser#parse()method. -
MassEditCommandParser#parse()method callsArgumentTokenizer#tokenize()to tokenize the inputStringinto keywords and store them in twoArgumentMultimapObjects. -
MassEditCommandParser#parse()method then create aExpenseContainsKeywordsPredicateObject. Then it callsEditExpenseDescriptor#createEditExpenseDescriptor()method to create anEditExpenseDescriptorObject which stores the fields of expenses which are going to be edited. -
A
MassEditCommandObject with theExpenseContainsKeywordsPredicateandEditExpenseDescriptorObject as parameters is created and returned toLogicManager. -
LogicManagerthen callsMassEditCommand#execute(),which callsModel#updateFilteredExpenseList()method to update the predicate of FilterList<Expense>.Model#getFilteredExpenseList()is called to return the FilterList<Expense>. -
All the
Expensein the FilterList<Expense> are then added to a new list. A loop starts and for eachExpensein the list,EditExpenseDescriptor#createEditedExpense()is called to create an edited Expense object. ThenModel#updateExpenseis called to replace the originalExpensewith editedExpense. -
When loop ends,
Model#updateFilteredExpenseList()is called to show the editExpenseto the user. ACommandResultis then created and returned toLogicManager.
Design Consideration
This feature can be implemented in different ways in terms of how the target expenses are edited. The alternative ways of implementation are shown below.
Aspect: How to Edit the targeted expenses
-
Alternative 1(current choice): Filter out the targeted expenses and replace them with edited expenses.
-
Pros: Easy to implement. Align with current architecture.
-
Cons: Time-consuming. Tend to take longer time when there is a large number of expenses.
-
-
Alternative 2: Store expenses in separate files. When the expenses are edited, move them to another file according to the edited fields.
-
Pros: Easy to identify the targeted expenses by checking relevant files. No need to check every expense.
-
Cons: Need to change original architecture of storage. May need to create new files during edition.
-