PROJECT: ExpenseTracker
Overview
This portfolio aims to document the contributions made by Jonathan Tan Jit Ming to the Expense Tracker.
Expense Tracker is the product of a project done under one of the Software Engineering modules at NUS.
The project involved working in a team of 5 people to enhance or morph an existing Address Book
application.
Expense Tracker is a desktop application that can be used track one’s expenses and features a Command Line Interface (CLI) as the main mode of interaction. Expense Tracker aims to provide users with the necessary tools to become a better saver. The main features of Expense Tracker are the managing of expenses, budget setting and expense statistics.
Summary of contributions
Refer to this link to see
my Code Contributions to Expense Tracker.
Below describes my contributions and enhancements to Expense Tracker and the project team:
Main feature
The main feature that I added was the functionality to display expense statistics, which is a bar chart or pie chart
showing the user’s expenditure organised by time or category. This is a core feature of Expense Tracker as it allows the user to be informed about their spending patterns, and therefore helping the user become a better saver.
This feature required an in-depth understanding of the software architecture as it involves multiple components of the application.
Other Contributions
These are other contributions that I made to the project and the team:
-
Ensured consistency in the language, formatting and structure of the project’s documentation. These changes can be seen in Pull Requests (PRs) #65, #66, #68, #89, #90, #95, #173, #180, #183, #185, and #189.
-
Reviewed PRs made by teammates by providing meaningful comments, where necessary. The PRs I reviewed include #72, #73, #76, #91, #94, #98, #109, #128, #170, #179, #186, #187 and #188.
Contributions to the User Guide
Given below are sections I contributed to the User Guide. They showcase my ability to write documentation targeting end-users. |
Showing expense statistics: stats
Changes the Expense List to show the Statistics Panel if the Expense List is currently showing, then
displays a graph of your expenditure over a specified time period, in a given MODE.
You can use this command to analyse your expenses, observe your spending patterns and to identify categories which take up most of your budget.
There are two available modes: Time and Category, which can be indicated by t or c respectively in the MODE parameter.
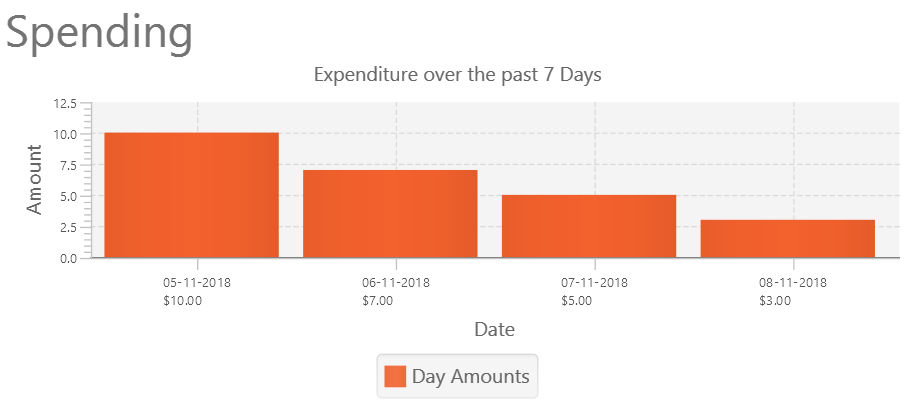
Choosing Time mode will show a bar chart, similar to the one below, in the statistics panel, where amounts for each day or month will displayed,
depending on the specified PERIOD_AMOUNT and PERIOD, starting from the current day or month.
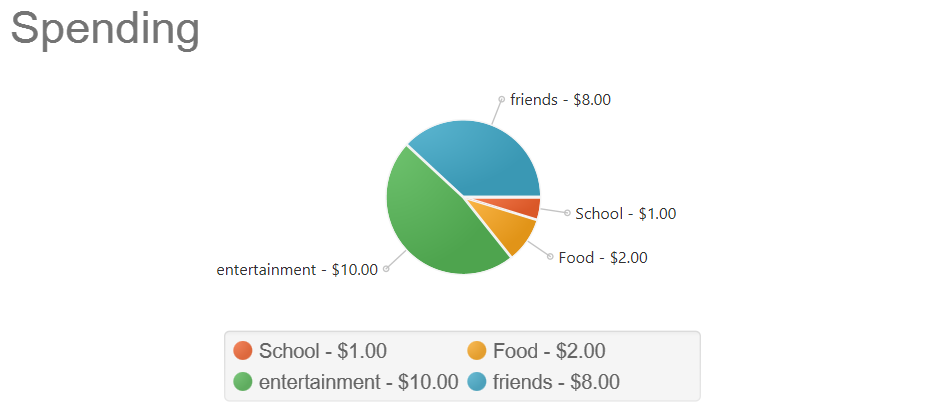
Choosing Category mode will show a pie chart, similar to the one below, in the statistics panel, where amounts for each category will displayed for
expenses in the specified PERIOD_AMOUNT and PERIOD.
The available options for PERIOD are d and m, which represents day and month respectively. E.g. if PERIOD_AMOUNT is 7
and MODE is d, the statistics will include data from the past 7 days.
Format: stats n/PERIOD_AMOUNT p/PERIOD m/MODE
|
Contributions to the Developer Guide
Given below are sections I contributed to the Developer Guide. They showcase my ability to write technical documentation and the technical depth of my contributions to the project. |
Statistics
The implementation of the Statistics function can be divided into two phases - preparation and execution. Given below is an explanation of how the statistics mechanism behaves at each phase.
Preparation
In the preparation phase, the program parses the command for statistics, prepares filters used by the model
and posts events in EventsCenter.
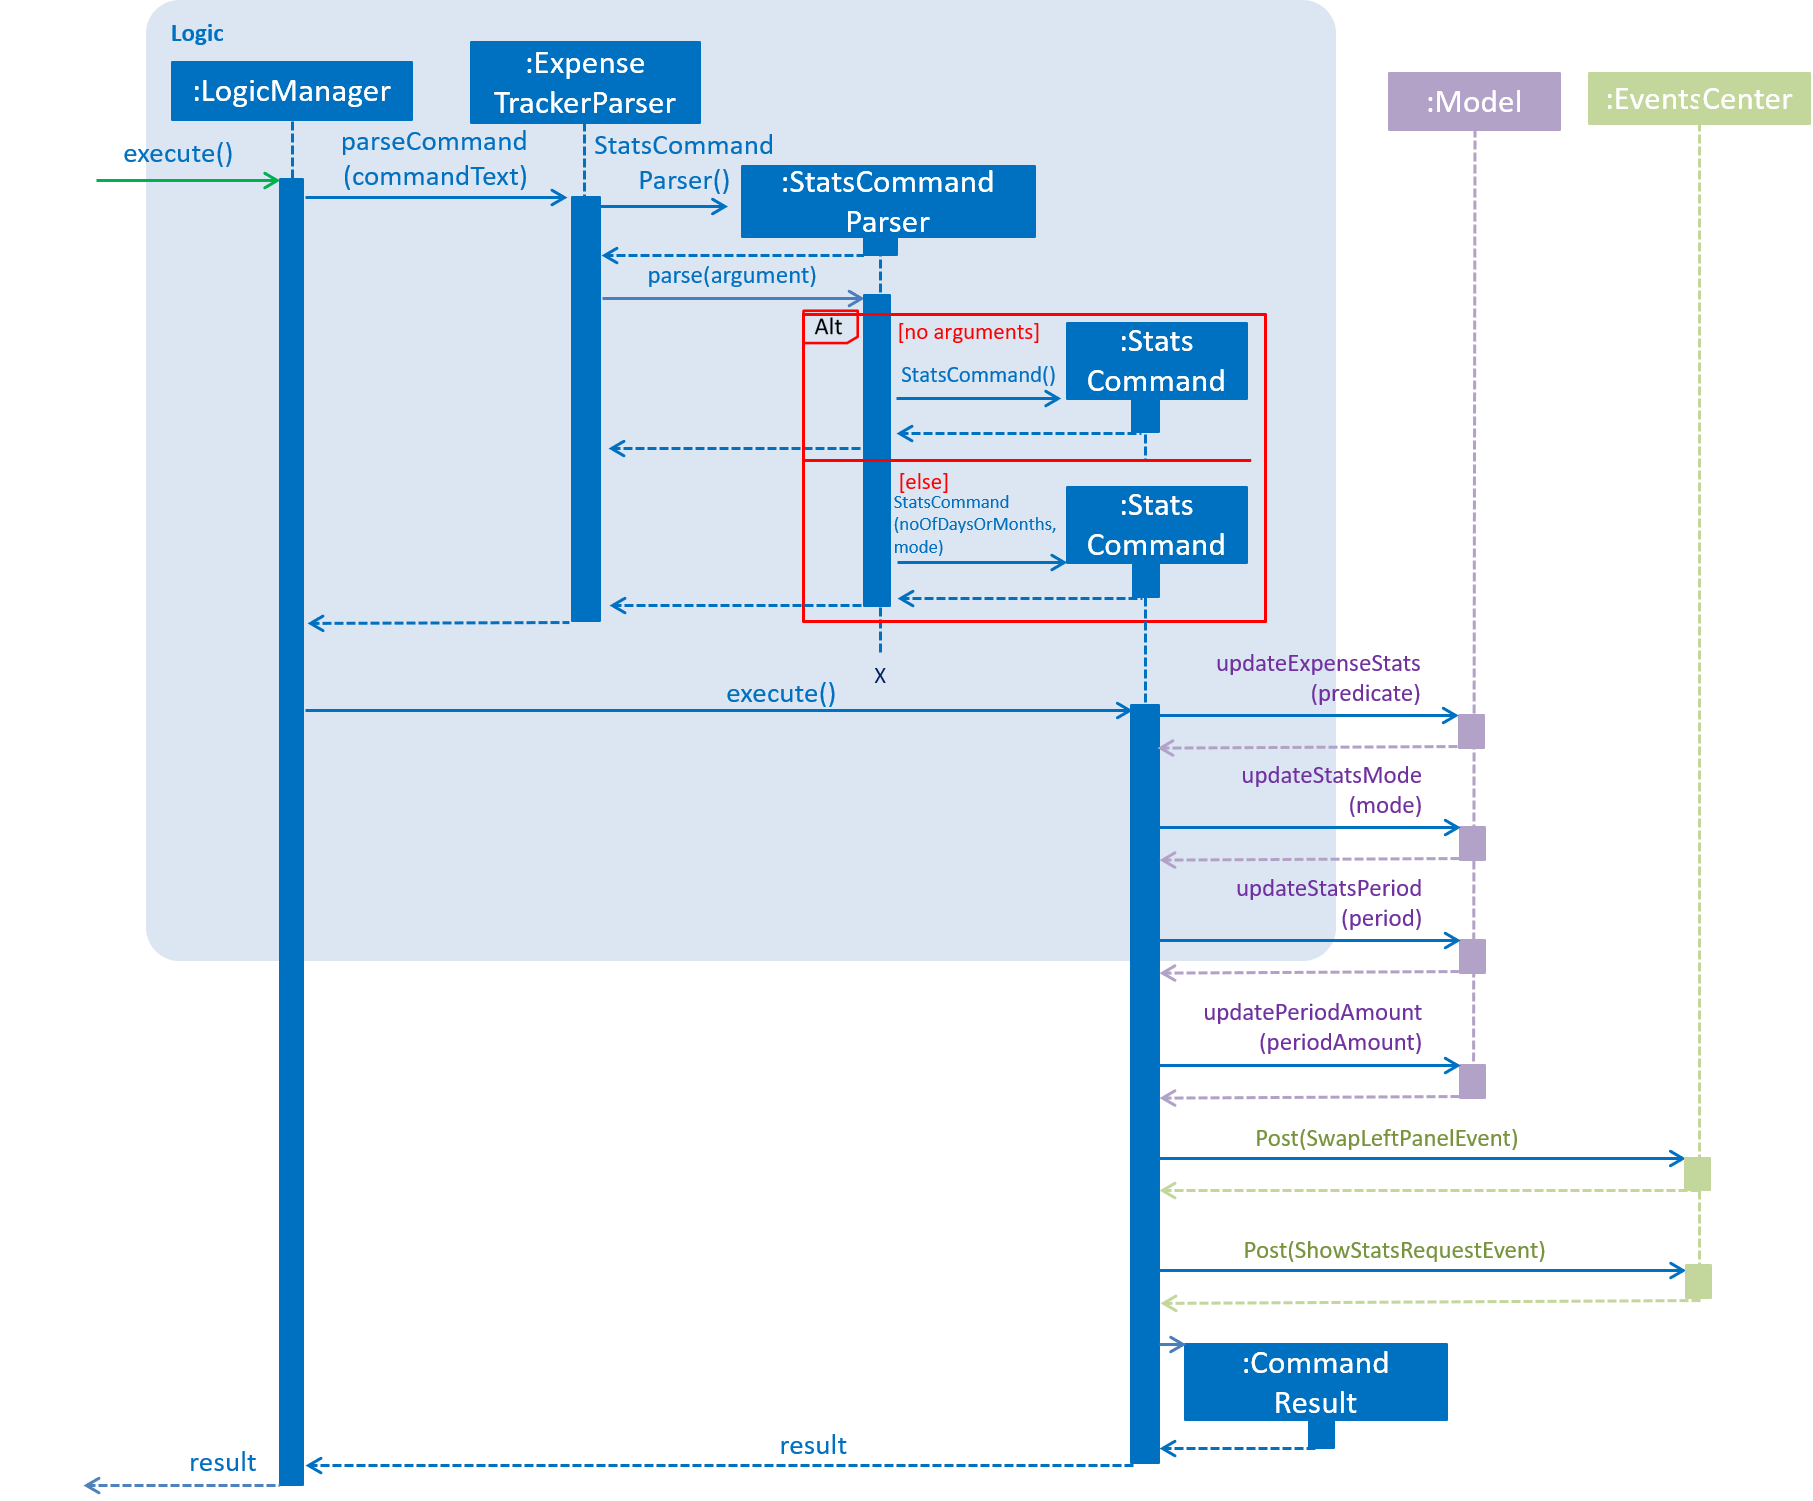
Below is the UML sequence diagram and a step-by-step explanation of the preparation stage.
-
User enters command
statscommand e.g.stats n/7 p/d m/t. The command is received byExpenseTrackerParser, which calls createsStatsCommandand callsStatsCommandParser#parse()to createStatsCommand. -
If no parameters are provided by the user,
StatsCommand#StatsCommand()is called to createStatsCommandwith the default parameters ofperiodAmountas7,periodasdandmodeast. Otherwise,StatsCommand#StatsCommand(periodAmount, period, mode)is called to createStatsCommandwith the specified parameters. -
StatsCommandchecks if the parameters are valid. If any parameter is invalid, an exception will be raised and a message will be displayed to the user. Otherwise, the parameters are stored in instance variables andStatsCommandis returned toLogicManager. -
LogicManagerthen callsStatsCommand#execute(), which updatesexpensePredicate,statsMode,statsPeriodandperiodAmountinModelManager, which are variables inModelManagerrelevant for statistics.StatsCommand#execute()also postsShowStatsRequestEventandSwapLeftPanelEventevents toEventsCenter.
Execution
In the execution phase, the program handles ShowStatsRequestEvent posted by StatsCommand by
processing and retrieving the data to be displayed and finally displaying it.
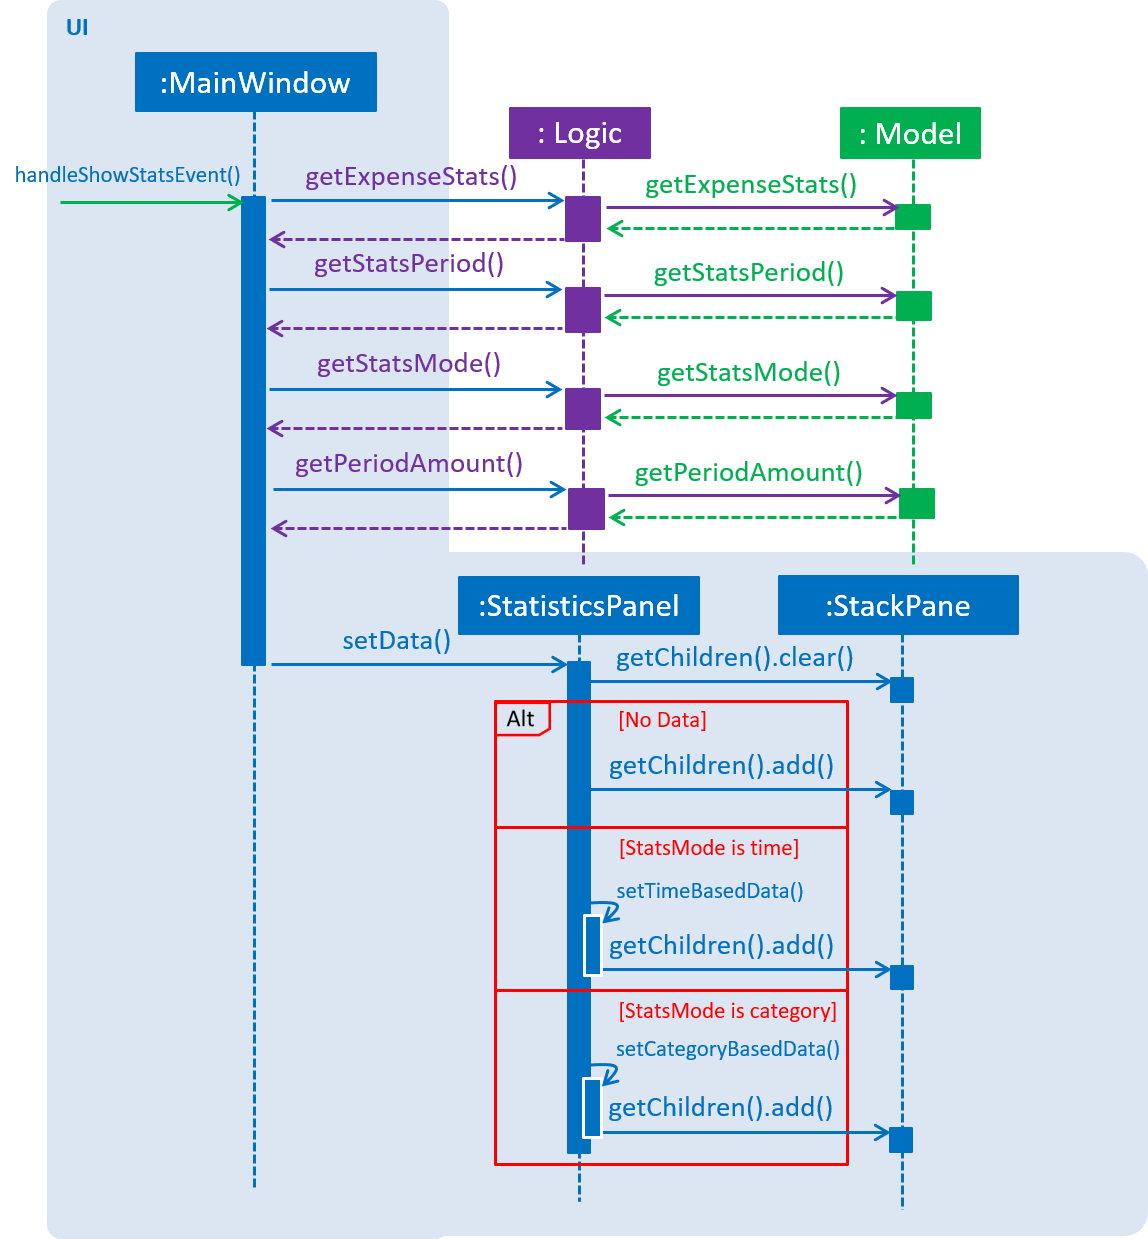
Below is the UML sequence diagram and a step-by-step explanation of the execution stage.
-
The
ShowStatsRequestEventevent is handled byMainWindow#handleShowStatsEvent(), which calls 'StatisticsPanel#setData()' and passes the data as parameters by callingLogic#getExpenseStats(),Logic#getStatsPeriod(),Logic#getStatsMode()andLogic#getPeriodAmount(). -
Logic#getExpenseStats()gets the filtered expense list by callingModel#getExpenseStats(), which returns an unmodifiableObservableList, only containing only expenses in the last 7 days, as perModelManager#expensePredicate, and sorted by date. -
Logic#getExpenseStats()then organises the data into aLinkedHashMap<String, Double>, where the key value pair represents the data series of the chart. IfStatsModeis set to TIME, the key and value pair represents date and cost. IfStatsModeis set to CATEGORY, the key value pair represents category and cost. Regardless of mode, the values are cumulative and is implemented using the algorithm in the following code snippet, using the example of category mode:LinkedHashMap<String, Double> stats = new LinkedHashMap<>(); for (Expense e : expenseList) { String category; category = e.getCategory().categoryName; if (stats.containsKey(category)) { stats.put( category, stats.get(category) + e.getCost().getCostValue() ); } else { stats.put(category, e.getCost().getCostValue()); } } -
Logic#getStatsPeriod(),Logic#getStatsMode()andLogic#getPeriodAmount()gets their respective data by calling the method of the same name inModel. -
Once the parameters are passed into
StatisticsPanel#setData(),StackPane#getChildren()#clear()is called to clear any display elements inStackPane. JavaFX’sBarChartandPieChartare used to render the charts. There are three scenarios which could happen:-
If the data received is empty, a
Textobject is generated andStackPane#getChildren()#add()is called, which informs the user that there are no expenditures -
If
StatsModeis set to TIME,StatisticsPanel#setTimeBasedData()will be called, which generates a Bar Chart and callsStackPane#getChildren()#add(), which adds it toStackPane. -
If
StatsModeis set to CATEGORY,StatisticsPanel#setCategoryBasedData()will be called, which generates a Pie Chart and callsStackPane#getChildren()#add(), which adds it toStackPane.
-
Design Considerations
Aspect: How to handle statistics data and parameters
-
Alternative 1 (current choice): Data and each parameter is handled as separate objects
-
Pros: Easy to implement.
-
Cons: Need to call multiple methods to get parameters
-
-
Alternative 2 (planned for future releases): Create Statistics object which contains data and all the parameters.
-
Pros: More scalable. Less method calls to get parameters.
-
Cons: None
-
Aspect: How to pass statistics data and parameters from Command to UI
-
Alternative 1 (current choice): UI gets all data and parameters from
Logic, which gets data fromModel.-
Pros: Easy to implement. Aligned with architecture.
-
Cons: A lot of method calls
-
-
Alternative 2: Pass data and parameters through event
-
Pros: Less method calls. Easier to read.
-
Cons: Not in alignment with architecture. Need to consider application startup when there are no events posted.
-