By: Team T12-1 Since: Oct 2018 Licence: MIT
- 1. Introduction
- 2. About
- 3. Quick Start
- 4. User Interface
- 5. Features
- 5.1. Signing up a user :
signup - 5.2. Logging in as an existing user :
login - 5.3. Setting a password for the current user :
setPassword - 5.4. Viewing help :
help - 5.5. Adding an expense:
add - 5.6. Editing an expense :
edit - 5.7. Editing multiple expenses :
massedit - 5.8. Deleting a expense :
delete - 5.9. Locating expenses by keywords:
find - 5.10. Listing all expenses :
list - 5.11. Setting a total budget:
setBudget - 5.12. Setting a recurrence frequency for total budget:
setRecurrenceFrequency - 5.13. Setting a Category Budget:
setCategoryBudget - 5.14. Listing entered commands :
history - 5.15. Undoing previous command :
undo - 5.16. Redoing the previously undone command :
redo - 5.17. Showing expense statistics:
stats - 5.18. Toggling Notifications:
notification - 5.19. Clearing all entries :
clear - 5.20. Exiting the program :
exit - 5.21. Encrypting text using your password :
encrypt - 5.22. Decrypting text using your password :
decrypt
- 5.1. Signing up a user :
- 6. FAQ
- 7. Command Summary
- 8. Command Shorthands
1. Introduction
Expense Tracker is a desktop application that you can use to track your expenses. Expense Tracker provides you with features such as setting a budget and expense statistics, which help you stay within your budget.
2. About
The Expense Tracker User Guide contains all the essential information for you to make full use of Expense Tracker. Jump to Quick Start to get started or go to Features for a list of all the commands available.
3. Quick Start
Follow these steps to start using Expense Tracker:
-
Install Java (version 9 or later) on your computer by going here and downloading the Java SE Runtime Environment for your operating system.
-
Download the latest
expensetracker.jarfile from here -
Copy the file to the folder which you want to use as the home folder for your Expense Tracker.
-
Double-click the
expensetracker.jarfile to start the app. The GUI will appear and look like this: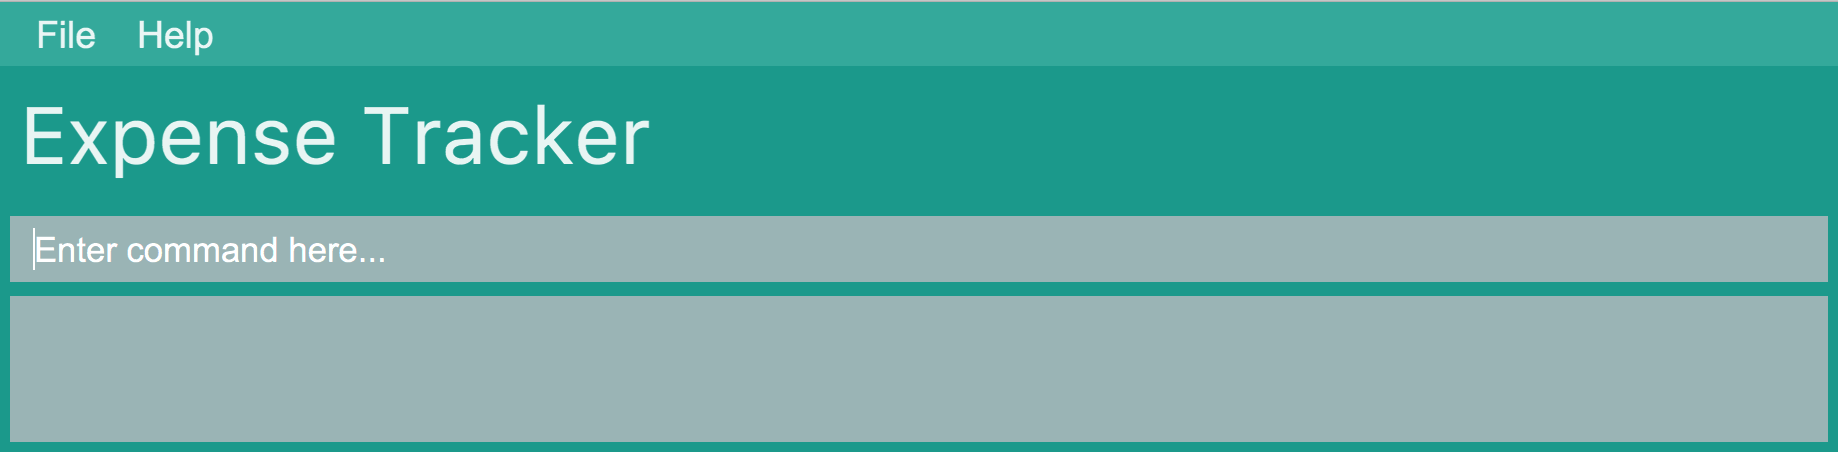 Figure 1. User interface on application launch
 -
Type the command
signup USERNAMEin the command box (the box where it says "Enter command here…") and press Enter to execute it, where USERNAME is the username of your choice. E.g.signup username123 -
Type the command
login u/USERNAMEin the command box and press Enter to execute it, where USERNAME is the username you signed up with in the previous step. e.g.login u/username123
You are now able to use all the commands of the app. -
Type commands in the command box, as highlighted in the figure below, and press Enter to execute it. Refer to Features for details on all the available commands.
e.g. typinghelpand pressing Enter will open the help window.
|
4. User Interface
After logging in, the interface will display as such:
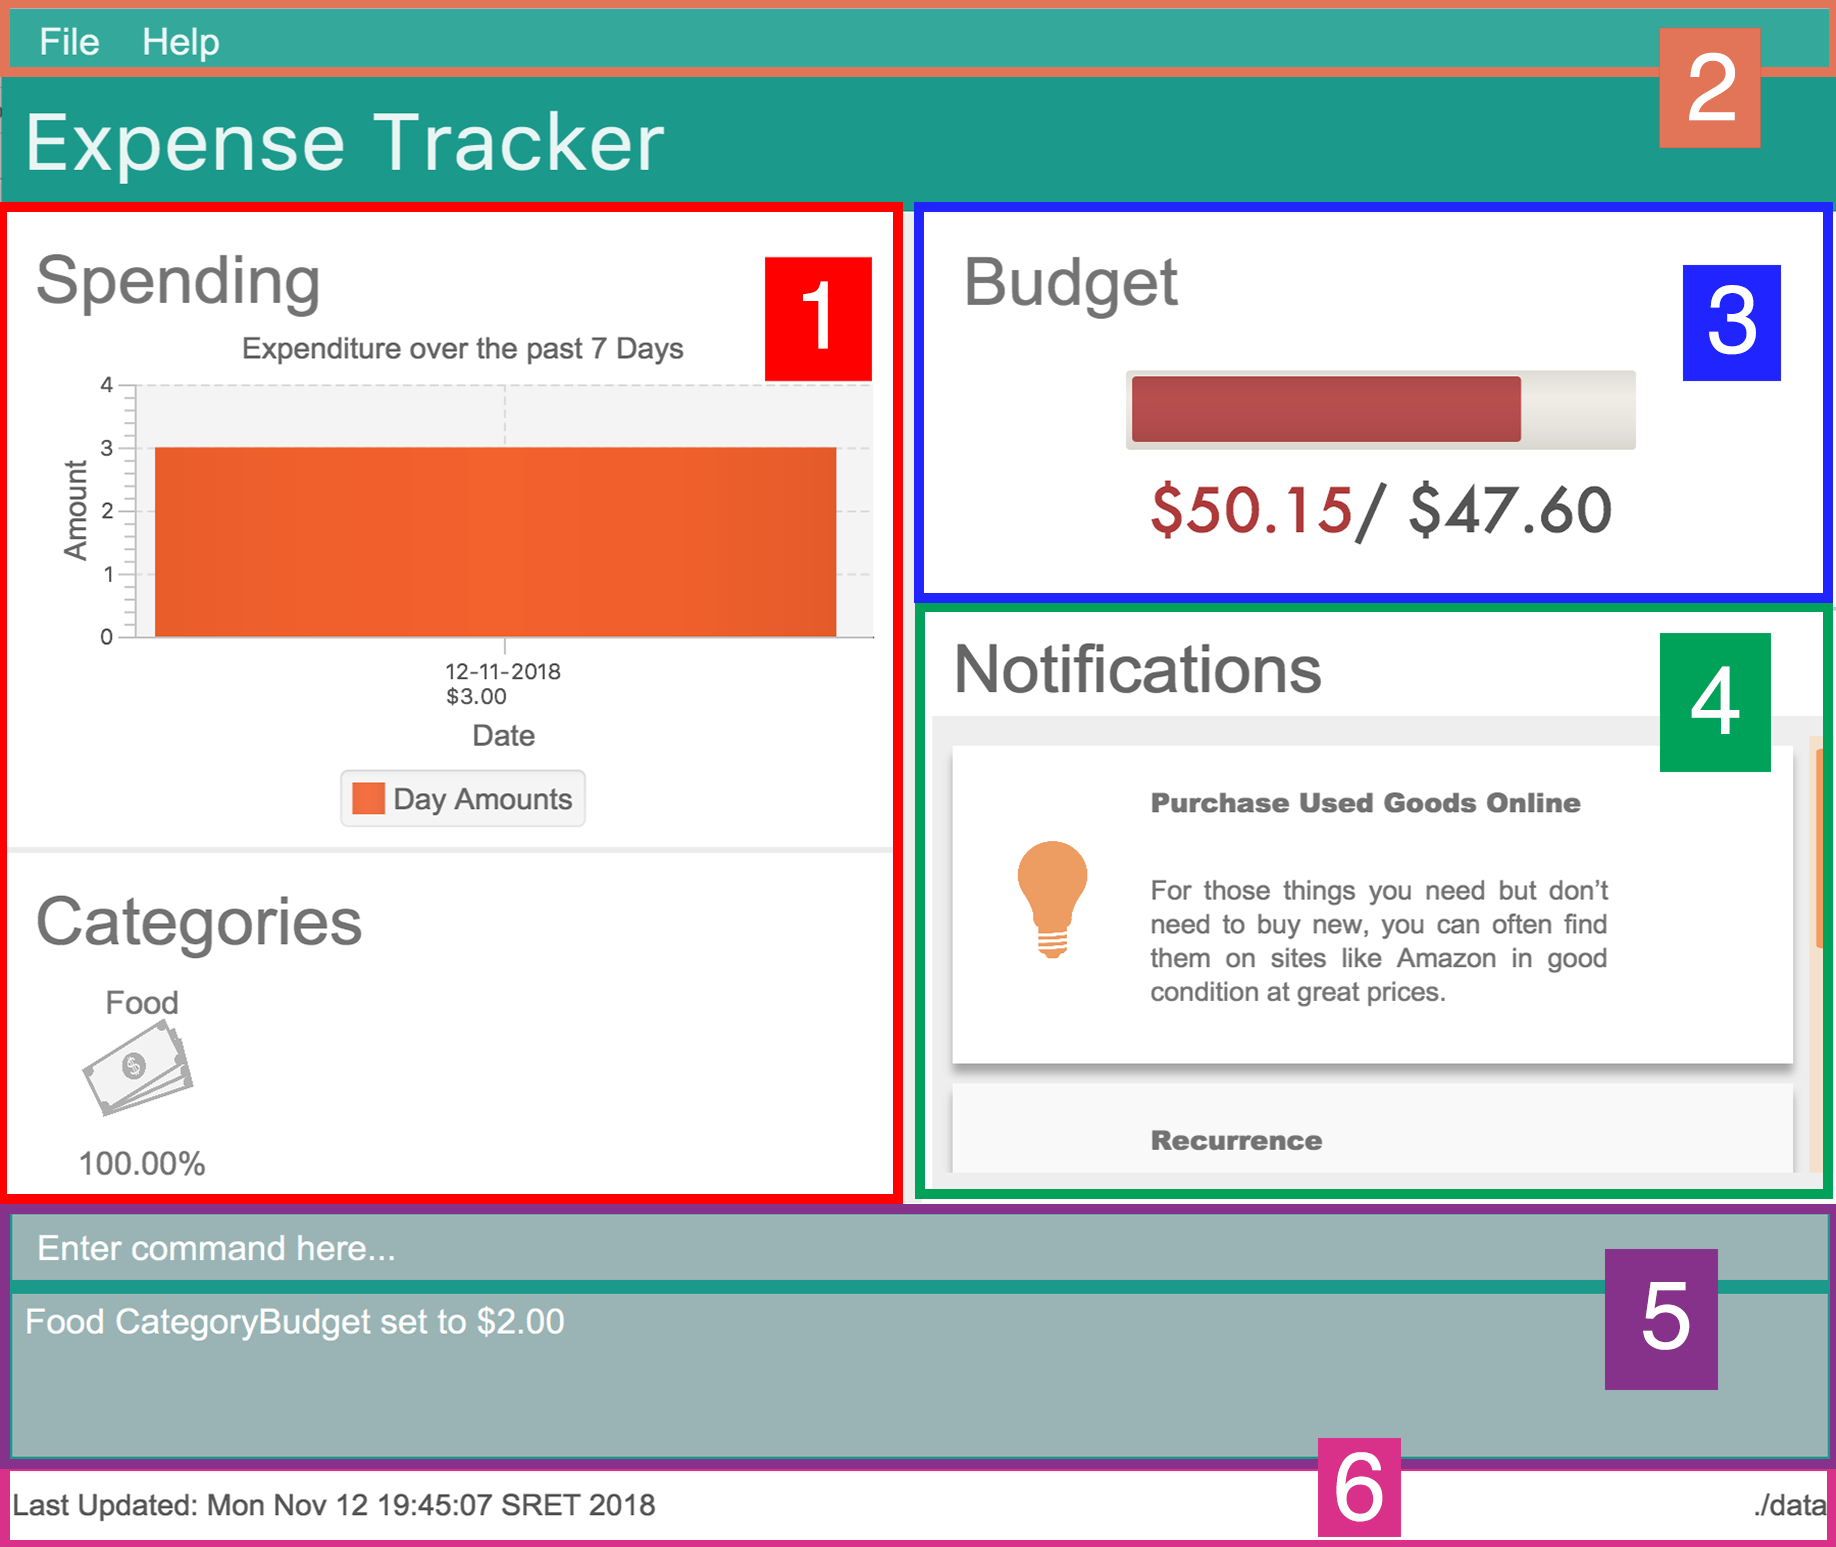
There are 6 main components to Expense Tracker, each highlighted by the coloured box in the diagram above.
4.1. Left Panel
This component is highlighted by the red box. There are two modes to this panel:
-
Expense List mode
-
Statistics Panel mode
You are able swap between Expense List mode and Statistics Panel mode by using the list command and
stats command, respectively.
4.1.1. Expense List mode
In Expense List mode, the Left Panel displays the list of all expenses, as shown below:
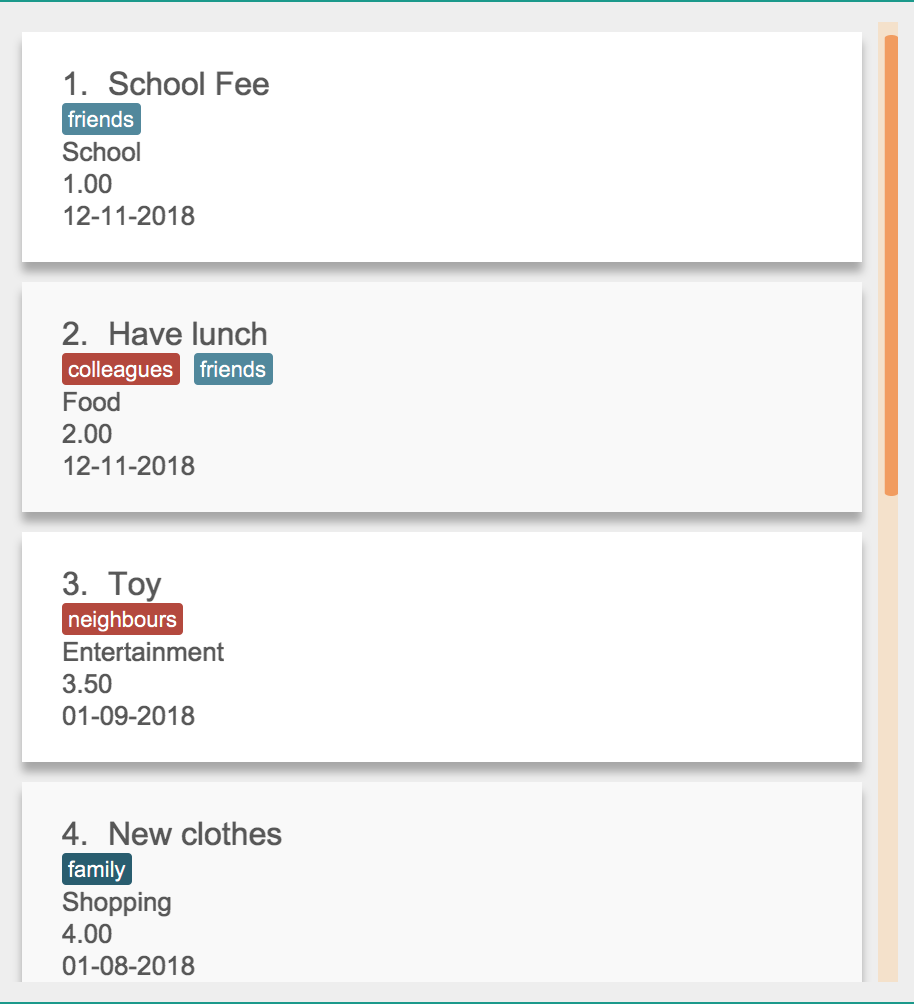
Commands that alter the Expense List, such as find and list, will change the expenses that are shown.
Each expense has an index number next to the expense name. These are relevant to the delete and edit commands.
4.1.2. Statistics Panel mode
In Statistics Panel mode, the Left Panel contains upper and lower sections, similar to what is shown below:
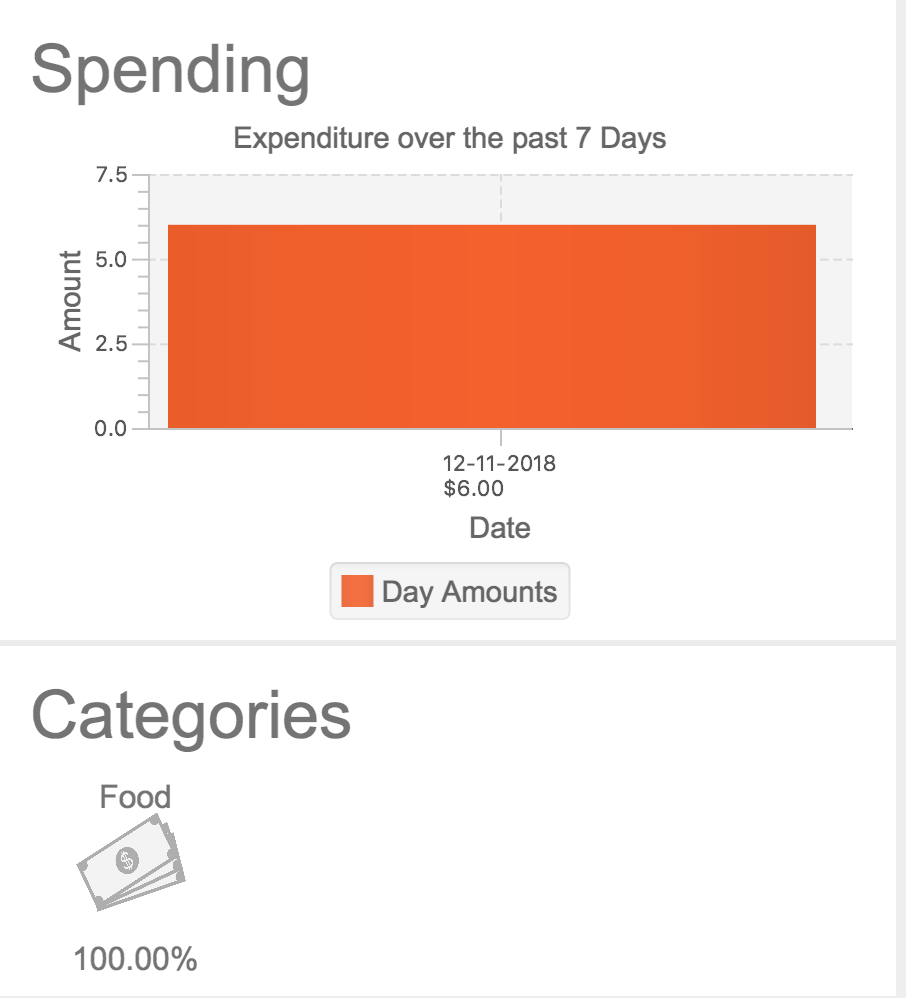
The upper section displays statistical information about expenses.
The type of statistics shown can be changed via the stats command.
See stats command for more details.
The lower section shows four of the category budgets that have been set using the setCategoryBudget command.
| If there are no category budgets set, the lower section will be empty, save for the title. |
See setCategoryBudget command for more details.
4.2. Budget Panel
This component is highlighted by the blue box.
The Budget Panel shows information about your total expenditure and
the budget which you set using the setBudget command.
See setBudget command for more details.
| On slow computers, it is possible that the texts in the Budget Panel may not appear. |
4.3. Notifications Panel
This is the portion highlighted by the green box.
The Notifications Panel is where any automated notifications will appear. These include warnings about your expenditure and saving tips that you should consider.
| The Notification Panel will only display a maximum of 10 notifications. If the Notification Panel is full, the oldest notification will be replaced by the newest notification. |
You can toggle notifications on and off with the notification command.
See notification command for more details.
4.4. Command Box and Console
This component is highlighted by the yellow box.
The Command Box is where the "Enter command here…" is located. To enter a command in the Command Box, use your mouse
and click anywhere within the box, then proceed to type a command.
The Console displays any success and error messages that is relevant to the most recent command entered.
4.5. Menu Bar
This component is highlighted by the orange box.
The menu bar contains two submenus, "file" and "help".
Click on "file" to reveal a dropdown containing the option "exit". Clicking on "exit" will close the application.
Entering the command exit into the Command Box achieves the same outcome.
Click on "help" to reveal a dropdown containing the option "help". Clicking on "help", or pressing the F1 key on your
keyboard, will open a Help Window.
Entering the command help into the Command Box achieves the same outcome.
4.6. Status Bar
This component is highlighted by the pink box.
On the leftmost side, the Status Bar displays the date and time of the last update to the Expense Tracker.
On the rightmost side, the Status Bar displays the directory or folder where the updated data was saved to.
5. Features
Take note of these instructions related to the format of the commands before using them:
Command Format
-
All commands begin with the command word. The command word may be followed by user-defined parameters.
-
According to the format of each command, words in
UPPER_CASEare the parameters which can be specified by you.-
E.g. the
logincommand has the format oflogin u/USERNAMEwhereUSERNAMEis a parameter which can be replaced by a specified value. In order to log in to an account with the username "username123", enter the commandlogin u/username123.
-
-
Parameters in square brackets are optional. This means that the parameter does not have to be included for the command to work.
-
E.g if a command has a parameter format of
n/EXPENSE_NAME [t/TAG], the parameters can be used asn/Birthday Present t/Girlfriend, which includes the "Girlfriend" tag, or asn/Birthday Present, which does not include a tag.
-
-
Parameters with
… after them can be used multiple times.-
E.g. if a command format contains the parameter
t/TAG…, the parameter can be replaced witht/friendort/friend t/family
-
-
Parameters can be in any order e.g. if the command format specifies
n/NAME c/CATEGORY, using the parametersc/CATEGORY n/NAMEis also acceptable.
|
These are the commands available to use in Expense Tracker:
5.1. Signing up a user : signup
Creates a new user in Expense Tracker. You can log in to your newly created user after signing up.
Format: signup USERNAME
|
5.2. Logging in as an existing user : login
Logs in to Expense Tracker as an existing user and expands the user interface to show Expense Tracker if it is not already showing.
Format: login u/USERNAME [p/PASSWORD]
|
5.3. Setting a password for the current user : setPassword
Sets a new password for the user which is currently logged in.
Format: setPassword n/NEW_PASSWORD [o/OLD_PASSWORD]
|
5.5. Adding an expense: add
Adds an expense to Expense Tracker.
Format: add n/EXPENSE_NAME $/COST c/CATEGORY [d/DATE] [t/TAG]…
|
5.6. Editing an expense : edit
Edits the expense at the specified INDEX. The INDEX refers to the index number shown in the displayed Expense List
next to the name of the expense in the Expense List.
Existing values of the expense will be edited according to the value of the parameters
Format: edit INDEX [n/EXPENSE_NAME] [$/COST] [c/CATEGORY] [d/DATE] [t/TAG…]
|
5.7. Editing multiple expenses : massedit
Edits the all expenses which match the keywords specified.
Existing values of the expense will be edited according to the value of the parameters
Format: massedit [n/EXPENSE_NAME] [$/COST] [c/CATEGORY] [d/DATE] [t/TAG…] -> [n/EXPENSE_NAME] [$/COST] [c/CATEGORY] [d/DATE] [t/TAG…]
|
5.8. Deleting a expense : delete
Deletes the expense at the specified INDEX. The INDEX refers to the index number shown in the displayed Expense List
next to the name of the expense.
Format: delete INDEX
|
5.9. Locating expenses by keywords: find
Finds expense which contains all the given keywords.
Format: find [n/NAME] [c/CATEGORY] [$/COST:COST] [d/DATE:DATE] [t/TAG…]
|
5.10. Listing all expenses : list
Updates the Expense List to show all expenses in Expense Tracker.
This command can be used after the find command is used, to display all the expenses in Expense Tracker,
as the find command will filter out certain expenses.
Format: list
5.11. Setting a total budget: setBudget
Sets a total budget. Available spending is defined as the total amount of expenses you can add before you exceed your budget. The Expense Tracker will warn you when adding an expense results in your available spending exceeding the total budget that is set to prevent yourself from overspending. The warning is shown below.
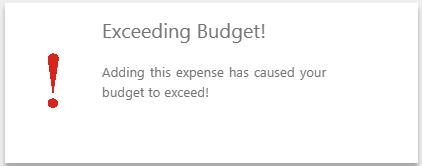
Format: setBudget MONEY_WITH_TWO_DECIMAL_PLACES
|
5.12. Setting a recurrence frequency for total budget: setRecurrenceFrequency
Sets the recurrence frequency for resetting the available spending of the total budget of Expense Tracker.
If you draw a salary/have an allowance, this would allow you to track the portion of money you have spent against your salary/allowance of the week/month. This ensures that you do not overspend on a certain day, causing you to not have enough money until you draw your next salary/allowance.
A diagram of a use case and its detailed explanation is given below:
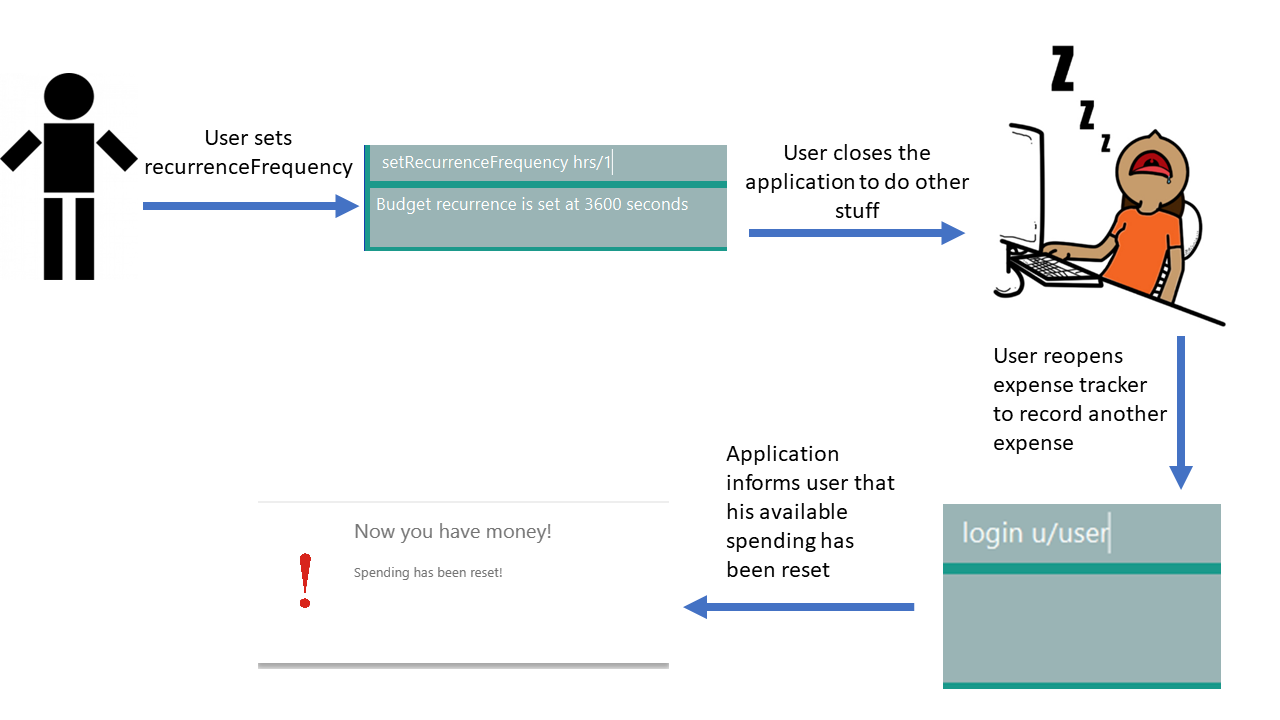
-
You type in the command
setRecurrenceFrequency hrs/24as you want your available spending to reset every day when you receive your allowance. -
You close the application.
-
You reopen the application on the next day to record another expense.
-
Your available spending will now be reset as it is past the set frequency of one day. A notification will be shown to inform you that this is done.
Format: setRecurrenceFrequency [hrs/HOURS] [min/MINUTES] [sec/SECONDS]
|
5.13. Setting a Category Budget: setCategoryBudget
Sets a Budget to limit expenses on a certain category. If adding an expense causes the available spending of that category to exceeds Category budget, a warning will be displayed.
Format: setCategoryBudget c/CATEGORY b/BUDGET
|
5.14. Listing entered commands : history
Lists all the commands that you have previously entered in reverse chronological order.
Format: history
|
Press the ↑ and ↓ arrows to display the previous and next commands respectively in the command box. |
5.15. Undoing previous command : undo
Restores Expense Tracker to the state before the previous undoable command was executed.
Undoable commands are commands that change expenses in Expense Tracker (add, delete, edit and clear).
Format: undo
5.16. Redoing the previously undone command : redo
Restores Expense Tracker to the state before the most recent undo command.
Format: redo
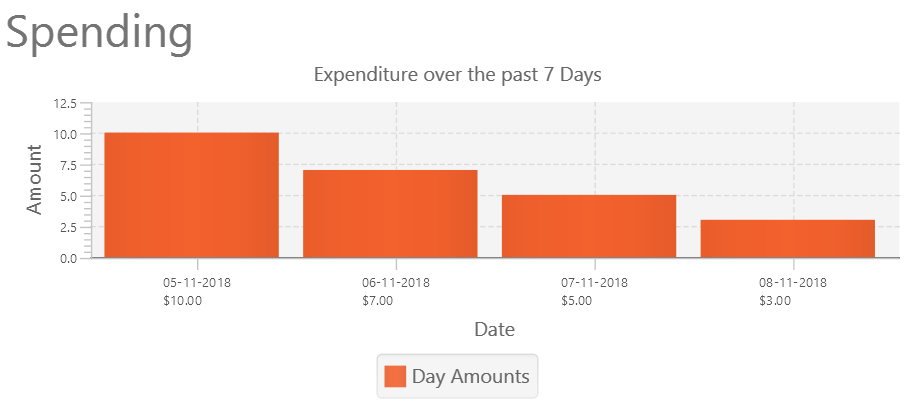
5.17. Showing expense statistics: stats
Changes the Expense List to show the Statistics Panel if the Expense List is currently showing, then
displays a graph of your expenditure over a specified time period, in a given MODE.
You can use this command to analyse your expenses, observe your spending patterns and to identify categories which take up most of your budget.
There are two available modes: Time and Category, which can be indicated by t or c respectively in the MODE parameter.
Choosing Time mode will show a bar chart, similar to the one below, in the statistics panel, where amounts for each day or month will displayed,
depending on the specified PERIOD_AMOUNT and PERIOD, starting from the current day or month.
Choosing Category mode will show a pie chart, similar to the one below, in the statistics panel, where amounts for each category will displayed for
expenses in the specified PERIOD_AMOUNT and PERIOD.
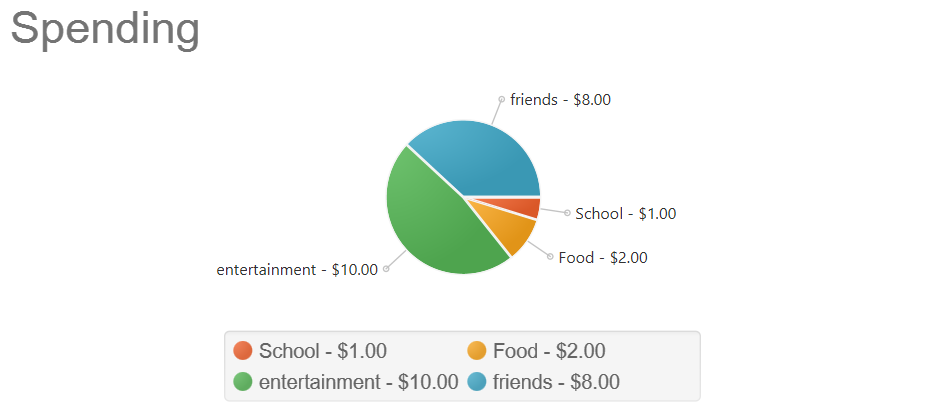
The available options for PERIOD are d and m, which represents day and month respectively. E.g. if PERIOD_AMOUNT is 7
and MODE is d, the statistics will include data from the past 7 days.
Format: stats n/PERIOD_AMOUNT p/PERIOD m/MODE
|
5.18. Toggling Notifications: notification
Toggles the ability of Expense Tracker to generate and display automated notifications.
There are 2 types of notification to toggle:
-
Warning - Referenced by
warningas theNOTIFICATION_TYPEparameter. These notifications will be sent when you are over or about to go over your budget. -
Tip - Referenced by typing
tipas theNOTIFICATION_TYPEparameter. These notifications are saving tips that will be sent once every 24 hours when you log onto an account.
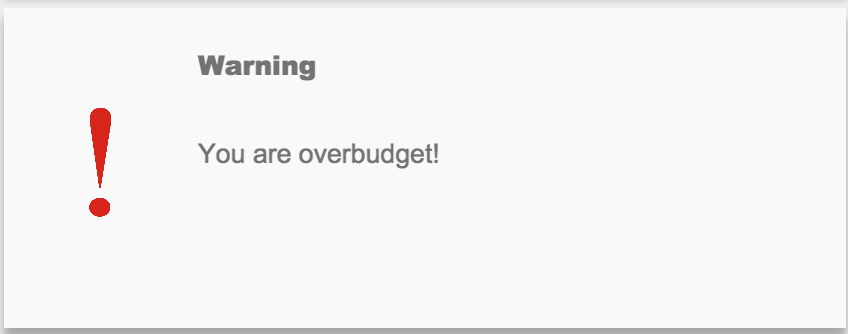
As shown below, Warning-type Notifications can be indicated by exclamation mark image displayed along with the notification:
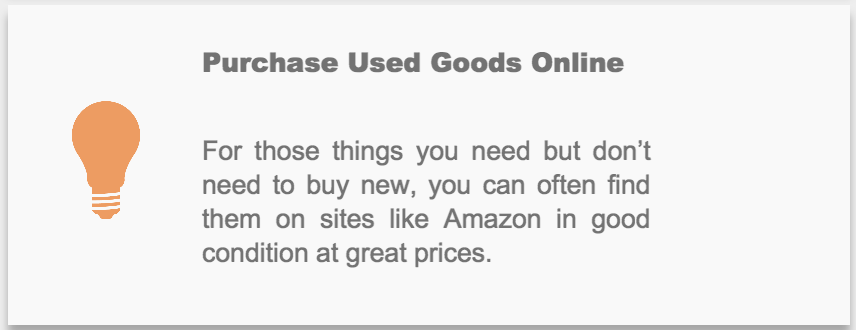
Meanwhile, Tip-type Notifications can be indicated by light bulb image displayed along with the notification:
There are two toggle options, on and off, which can be indicated by 'on' or 'off' respectively in the TOGGLE_OPTION parameter.
TOGGLE_OPTION is a required parameter. NOTIFICATION_TYPE can be omitted.
Format: notification n/NOTIFICATION_TYPE t/TOGGLE_OPTION
|
5.21. Encrypting text using your password : encrypt
| This command is for advanced users only and should be used with caution. |
Encrypts text using your account’s password. You may want to use this feature if you wish to edit your expenses in the data file directly.
Format: encrypt TEXT
|
5.22. Decrypting text using your password : decrypt
| This command is for advanced users only and should be used with caution. |
Decrypts an encrypted text that has been encrypted using your account’s password. You may want to use this feature if you wish to edit your expenses in the data file directly.
Format: decrypt TEXT
|
6. FAQ
Q: Do I need to manually save my data?
A: There is no need to save your manually. All the data in Expense Tracker is automatically saved in the hard disk
after any command that changes the data.
Q: How do I transfer my data to another Computer?
A: Install the app in the other computer and copy the data folder in your previous Expense Tracker folder over to the new Expense Tracker folder on your other Computer.
If you wish to copy only one user over, create a folder named data in the app directory on the other computer and copy the xml file with your username in the data folder of the old computer into the data folder of the new computer.
Q: How is my expense data kept safe when I use this application?
A: All user expense-specific data is encrypted. The program ensures that no one will be able to decrypt encrypted information without your actual plain text password, which is not stored anywhere. So rest assured that no one can access your data without your password.
Q: How do I manually encrypt text to edit my user XML file as a technologically-savvy user?
A: You can make use of the encrypt and decrypt commands that have been described in the previous section.
7. Command Summary
This is a summary of the commands available in Expense Tracker:
-
Sign up :
signup USERNAME
e.g.signup username123 -
Login :
login u/USERNAME [p/PASSWORD]
e.g.login u/username123 p/password1 -
Set Password :
setPassword n/NEW_PASSWORD [o/OLD_PASSWORD]
e.g.setPassword n/pass1 o/passold -
Help :
help -
Add
add n/EXPENSE_NAME $/COST c/CATEGORY [d/DATE] [t/TAG]…
e.g.add n/Lunch e/4 c/Food -
Edit :
edit INDEX [n/EXPENSE_NAME] [$/COST] [c/CATEGORY] [d/DATE] [t/TAG…]
e.g.edit 2 n/Lunch e/4 c/Food -
Mass Edit :
massedit [n/EXPENSE_NAME] [$/COST] [c/CATEGORY] [d/DATE] [t/TAG…] → [n/EXPENSE_NAME] [$/COST] [c/CATEGORY] [d/DATE] [t/TAG…]
e.g.`massedit c/school -> c/food -
Delete :
delete INDEX
e.g.delete 3 -
Find :
find [n/NAME] [c/CATEGORY] [$/COST:COST] [t/TAG] [d/DATE:DATE]
e.g.find c/School -
List :
list -
Set budget for Expense Tracker :
setBudget
e.g.setBudget 20.00 -
Set recurring frequency for the budget:
setRecurrenceFrequency [hrs/HOURS] [min/MINUTES] [sec/SECONDS] -
Set category budgets :
setCategoryBudget c/CATEGORY b/BUDGET -
History :
history -
Undo :
undo -
Redo :
redo -
Statistics :
stats n/NUMBER_OF_DAYS_OR_MONTHS m/MODE
e.g.stats n/7 m/d -
Toggle Notifications :
notification n/NOTIFICATION_TYPE t/TOGGLE_OPTION
e.g.notification n/tip t/off -
Clear :
clear -
Exit :
exit -
Encrypt :
encrypt TEXT -
Decrypt :
decrypt TEXT
8. Command Shorthands
Commands also come with command shorthands which can be used in place of the command word. I.e. using h has the same outcome as help
This is a list of commands and their command shorthands in Expense Tracker:
-
signup:su -
login:li -
setPassword:sp -
help:h -
add:a -
edit:e -
delete:d -
find:f -
list:l -
setBudget:sb -
setRecurringFrequency:srf -
setCategoryBudget:scb -
history:h -
undo:u -
redo:r -
stats:su -
notification:n -
clear:c -
exit:x